How to Make a Sourdough Starter From Scratch (And Set Yourself Up for Baking Success)
Making a sourdough starter from scratch is one of the most rewarding ways to begin your bread‑baking journey. With just flour, water, and time, you can cultivate wild yeast and beneficial bacteria that naturally leaven bread and create complex flavor. While sourdough has a reputation for being tricky, success comes from understanding the process and having the right tools to support it.
This step‑by‑step guide walks you through how to make a sourdough starter at home, explains what to expect at each stage, and shows how the Deluxe Simply Sourdough Bread Baking Kit helps simplify the entire process from starter to finished loaf.
Table of Contents:
- What Is a Sourdough Starter?
- Tools and Ingredients for Making a Starter From Scratch
- 14-Day Sourdough Starter Timeline (Beginner Guide)
- When and How to Feed a Sourdough Starter
- Temperature and Its Effect on Fermentation
- Hooch vs. Water Separation: What’s the Difference?
- When to Start Using Sourdough Discard
- When Is a Sourdough Starter Ready to Bake?
- From Starter to Loaf: Why the Right Tools Matter
- Frequently Asked Sourdough Starter Questions
- Final Thoughts: Building Confidence With Sourdough

What Is a Sourdough Starter?
A sourdough starter is a living culture made by mixing flour and water and allowing naturally occurring wild yeast and lactic acid bacteria to ferment the mixture over time. These microbes produce carbon dioxide, which leavens bread, and organic acids, which build flavor and structure.
Once established, a starter becomes the foundation for sourdough bread and other bakes. No commercial yeast required!
Tools and Ingredients for Making a Starter From Scratch
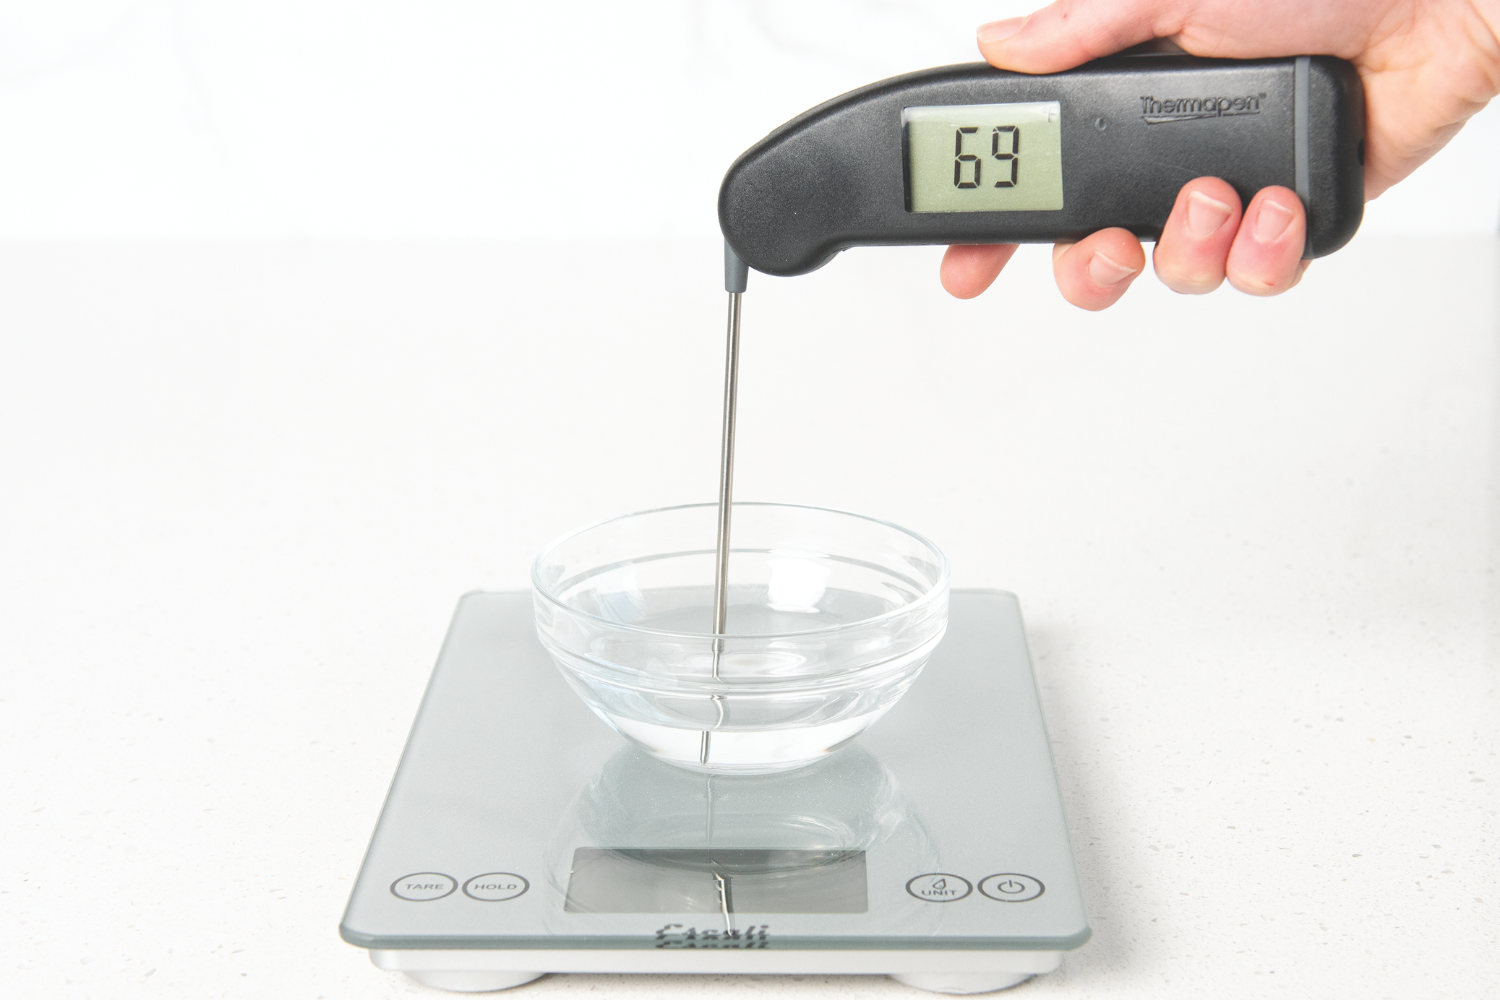
Success begins with simple, intentional choices. You’ll need a food‑safe container with a loose‑fitting lid, along with a digital kitchen scale to measure ingredients by weight. Accurate measurement is critical for consistent fermentation.
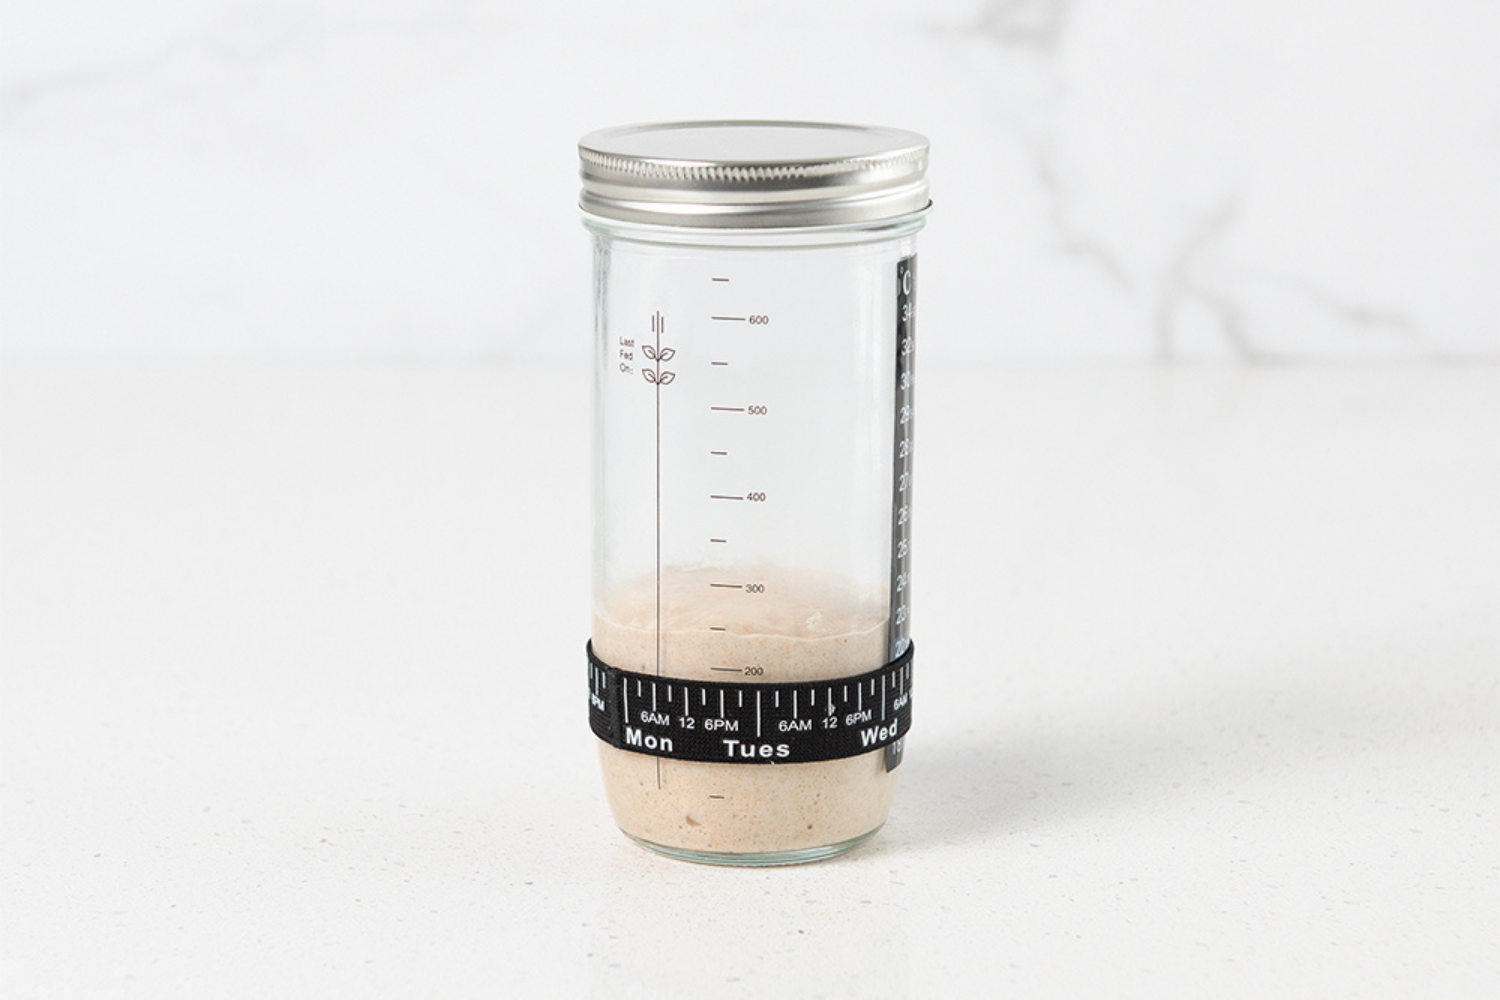
The glass starter jar included in the Deluxe Simply Sourdough Bread Baking Kit is especially helpful for beginners. Its clear sides, temperature strip, and tracking band make it easier to see rise, evaluate activity, and learn when your starter is truly ready to be fed.
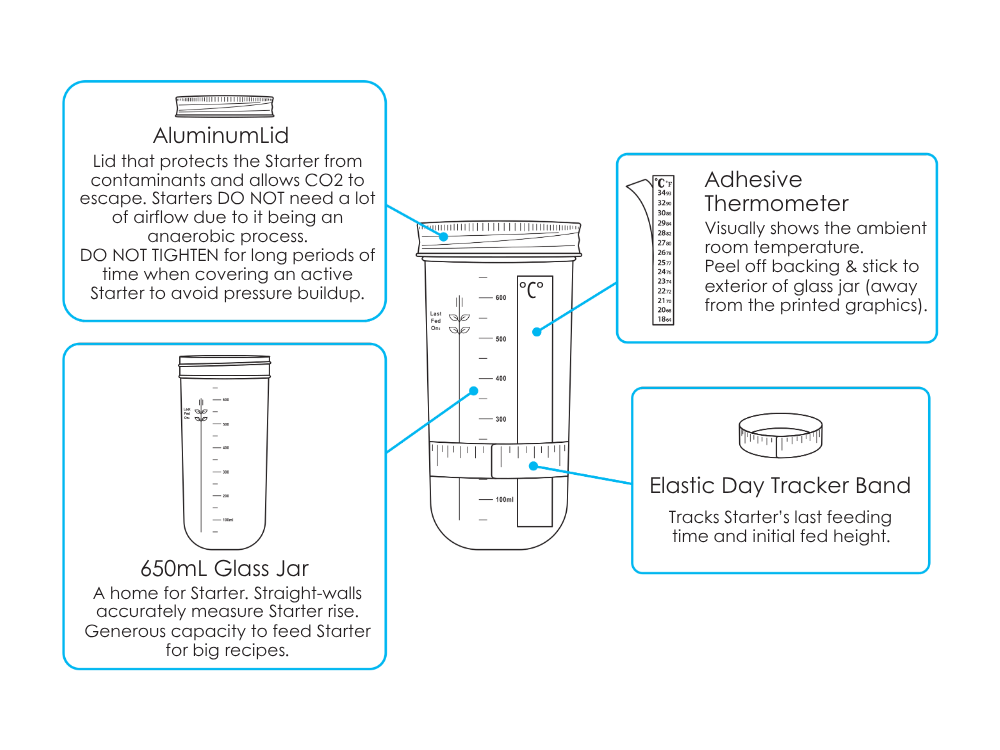
When feeding, use at least 50% whole wheat flour (or 25% rye) blended with unbleached bread or all‑purpose flour. Whole grains provide the wild yeast and bacteria needed to jump‑start fermentation, while refined flour offers easily digestible food. Always use filtered or non‑chlorinated water, as chlorine can inhibit microbial growth.
Do I have to Make a Starter from Scratch?
While creating a starter from scratch is rewarding, it isn’t the only or even the most reliable way to begin baking sourdough. Many experienced bakers recommend sourcing a starter from a friend, local bakery, or online starter exchange.
An established starter is already stable, predictable, and strong, which often leads to more reliable fermentation and better bread right away. Sharing starters has long been part of sourdough culture, and starting this way can be a great way to connect with your local baking community while building confidence.
You can always experiment with making your own starter later once you understand the rhythms of fermentation.
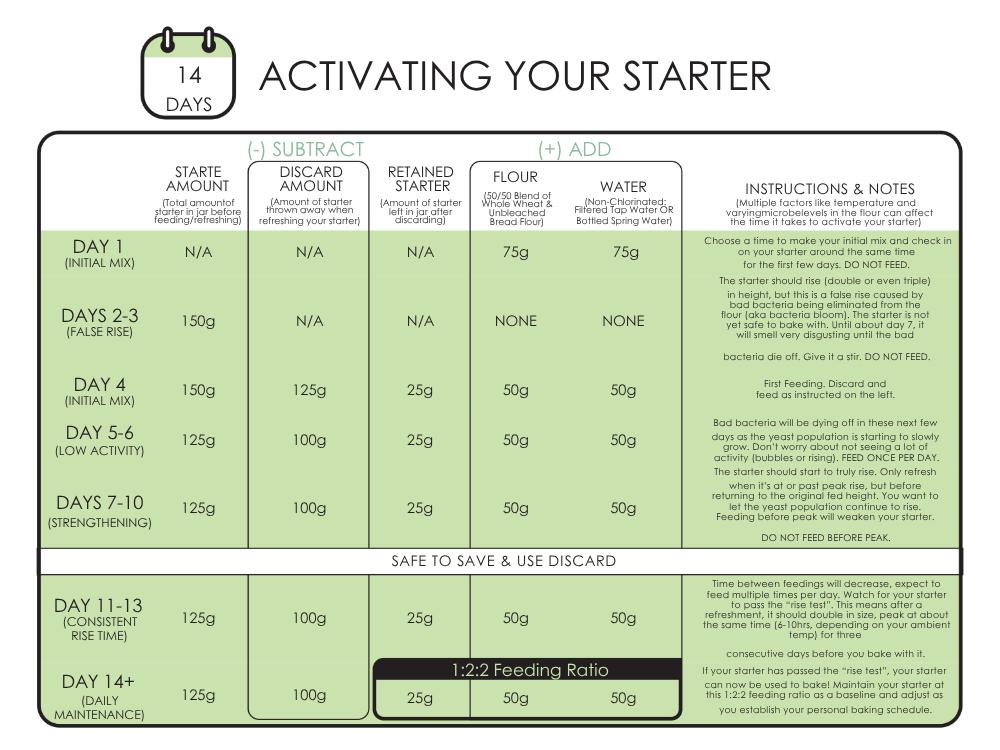
14‑Day Sourdough Starter Timeline (Beginner Reference Guide)
Every sourdough starter develops at its own pace, but almost all follow the same biological pattern. Use this timeline as a general guide, not a strict schedule. If your starter moves faster or slower, that’s completely normal. Always trust what you see more than the calendar.
Day 1: Initial Mix
Combine equal weights of flour and water into a thick paste. The mixture should be stiff enough to hold its shape rather than pour. We recommend 75g water to 75g flour (37.5g bread flour and 37.5g whole wheat flour). Cover loosely with the metal lid so CO2 can still escape and leave it undisturbed at room temperature. There will be no rise yet, and it will smell like wet flour. At this stage, you are simply rehydrating dormant microbes in the flour.
Day 2: Early Activity
You may see a few small bubbles on the surface or along the sides of the jar. There is usually no rise. The aroma remains mild and floury. These early bubbles indicate microbial activity is beginning, but the starter is still very weak. Do not feed or discard yet.
Day 3: The “False Rise”
Many starters show a noticeable rise or frothy bubble activity around day two or three. This is caused by an early bacterial bloom, not yeast. The starter may smell unpleasant or sulfur‑like. This is normal and temporary. Do not feed, discard, or bake with the starter at this stage.
Day 4: Activity Drops
The false rise subsides and the starter often looks flat or inactive. This is one of the most discouraging days for beginners, but it’s a critical transition. Undesirable bacteria are dying off, and yeast is beginning to establish itself. Begin your first discard and feeding if you saw early activity. Expect strong or unpleasant odors.
When feeding at this point, be cautious not to over-discard. You will want to keep 25g in the jar to ensure enough original yeast bacteria remains. Feed a 1:2:2 ratio of starter, flour, and water by grams ensuring that the flour is a 50/50 blend of whole wheat and bread flour.
Pro Tip: Mix a large batch of 50/50 whole wheat and bread flour and store in an airtight container to use for all starters feedings.

Day 5: Quiet Development
There is usually little to no rise. You may see a few surface bubbles and possibly clear liquid, which is water separation, not hooch. The smell can still be sharp or funky. This is a normal part of development. Feed only if you see increased bubble activity compared to the previous day.
Day 6: Subtle Improvement
Bubbles become more noticeable, especially on the surface, though the starter still may not rise much in height. Aromas may begin to soften slightly. This is often the last of the truly “quiet” days. Avoid overfeeding or changing your routine.
Day 7: First Yeast‑Driven Rise
Many starters show their first true yeast‑driven rise around day seven. The starter may rise, dome slightly, and then fall. The smell begins to shift toward something mildly tangy or yeasty. Feed only after the starter reaches its peak and starts to collapse.
Day 8: Faster Rising
The starter begins rising more predictably and may peak within 8–10 hours after feeding. Bubble activity is stronger and more evenly distributed. This indicates the yeast population is growing.
Day 9: Strength Building
Rising continues to speed up, sometimes peaking in 6–8 hours. The starter smells pleasantly yeasty and slightly acidic. Texture becomes lighter and more aerated. Continue feeding only after peak activity.
Day 10: Approaching Readiness
Many starters begin passing basic readiness checks around day ten. The starter may roughly double in volume and peak more quickly. Do not rush into baking yet! Consistency is more important than a single good rise.
Day 11: Consistency Check
A healthy starter should now be rising reliably after each feeding. You’re looking for predictable timing, steady bubble formation, and a clean, tangy aroma. At this point, the starter is still young but improving daily.
Day 12: Increased Reliability
The starter peaks faster and more consistently. The aroma is yeasty, slightly acidic, and clean. The structure looks airy and elastic. This is when many starters begin behaving like reliable leavening agents.
Day 13: Ready‑to‑Bake Confirmation
A starter that roughly doubles within 4–7 hours after feeding, at room temperature, and repeats this behavior consistently is considered ready. Speed matters more than height. Some starters double, some don’t, but a fast rise signals strength.
Day 14: Bake with Confidence
By day fourteen, most starters are strong enough to bake with regularly. Continue maintaining it with well‑timed feedings, and expect it to keep improving over the next few weeks as flavor and strength deepen. This is also when you can start saving the discard to use for other recipes.
For more tips and tricks on maintaining an established sourdough starter, check out our blog “How to Maintain a Sourdough Starter: Easy Tips for a Healthy Starter”.
The First Few Days: Why the Initial Rise Matters
In the first two to three days of starting a sourdough starter, you should see some level of early activity, often a bubbly or foamy rise known as the “false rise.” This is caused by early bacterial bloom, not yeast, but it’s an important sign that fermentation has begun.
If you see absolutely no bubbling or rise at all after several days, it’s usually best to start over. This can result from old or only using overly refined flour (such as all-purpose), chlorinated or reverse osmosis water, or an environment that’s too cold. Using fresh whole‑grain flour, filtered water, and warm (but not hot) conditions dramatically improves success.
Patience: Where Most Bakers Give Up
The most common point of failure happens between days four and six. After the initial activity, starters often appear to stall or “die.” There’s little rise, unpleasant aromas, and just a few surface bubbles, if any.
This phase is normal and necessary. The early bacteria are fading away, and yeast is slowly multiplying. Many bakers accidentally sabotage their starter at this stage by feeding too often, discarding too aggressively, or adding unnecessary ingredients.
Patience is not just helpful here, it’s essential. This is also where having visual tools, like a clear starter jar with a tracking band, can reassure you that subtle changes are happening even when things look quiet.
Learn more about what tools are necessary for baking homemade bread here.
When and How to Feed a Sourdough Starter
A starter should be fed based on activity, not the clock. You’ll know it’s ready when it has risen, reached its peak, and begun to fall. Feeding too early dilutes the yeast before it has multiplied; feeding too late is rarely harmful in the early days.
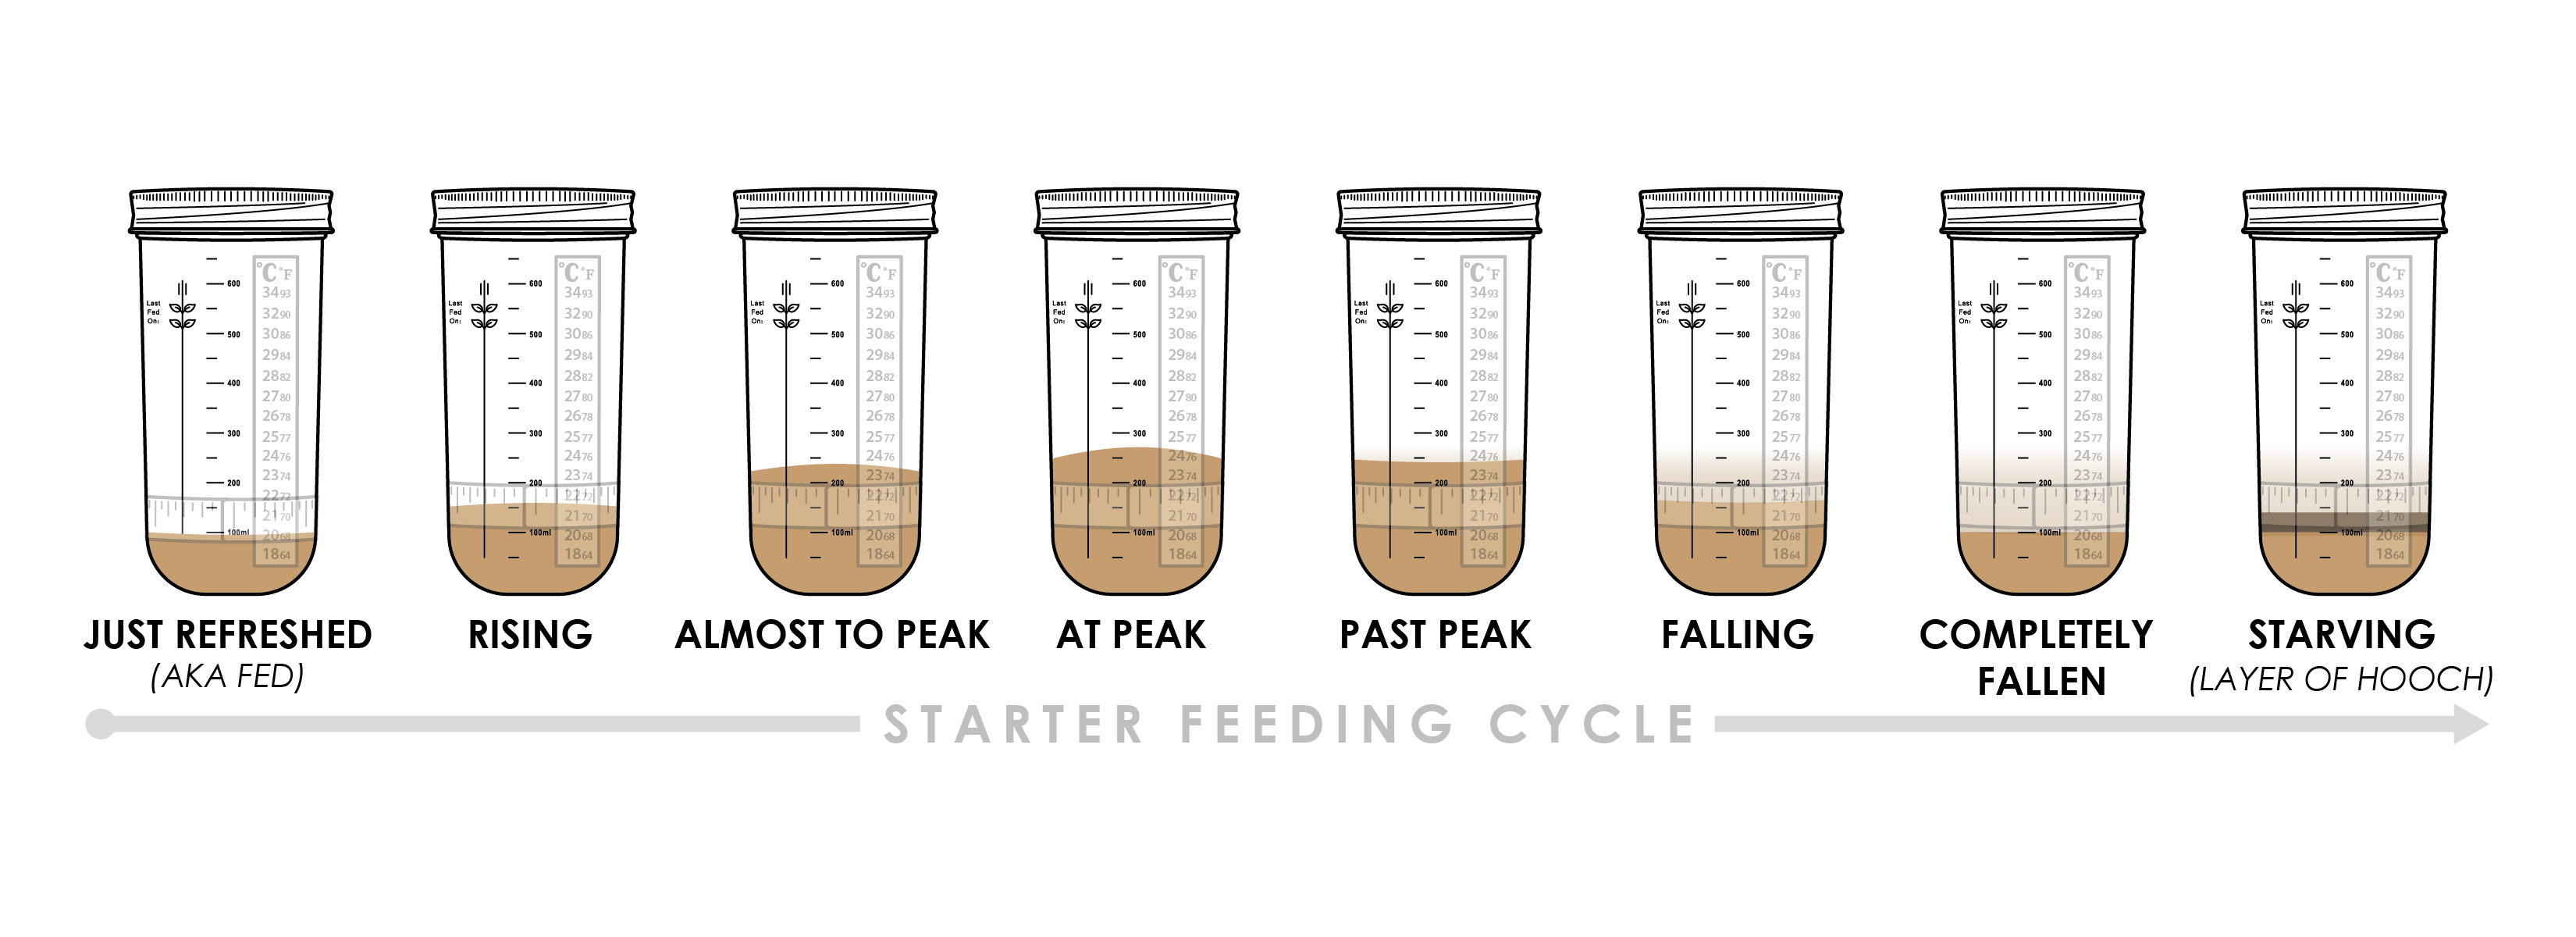
Look for increased bubbles, visible rise, and a shift from unpleasant odors to something mildly tangy or yeasty. When in doubt, wait longer. Strong starters come from well‑timed feedings, not frequent ones.
How to feed a sourdough starter (step-by-step):
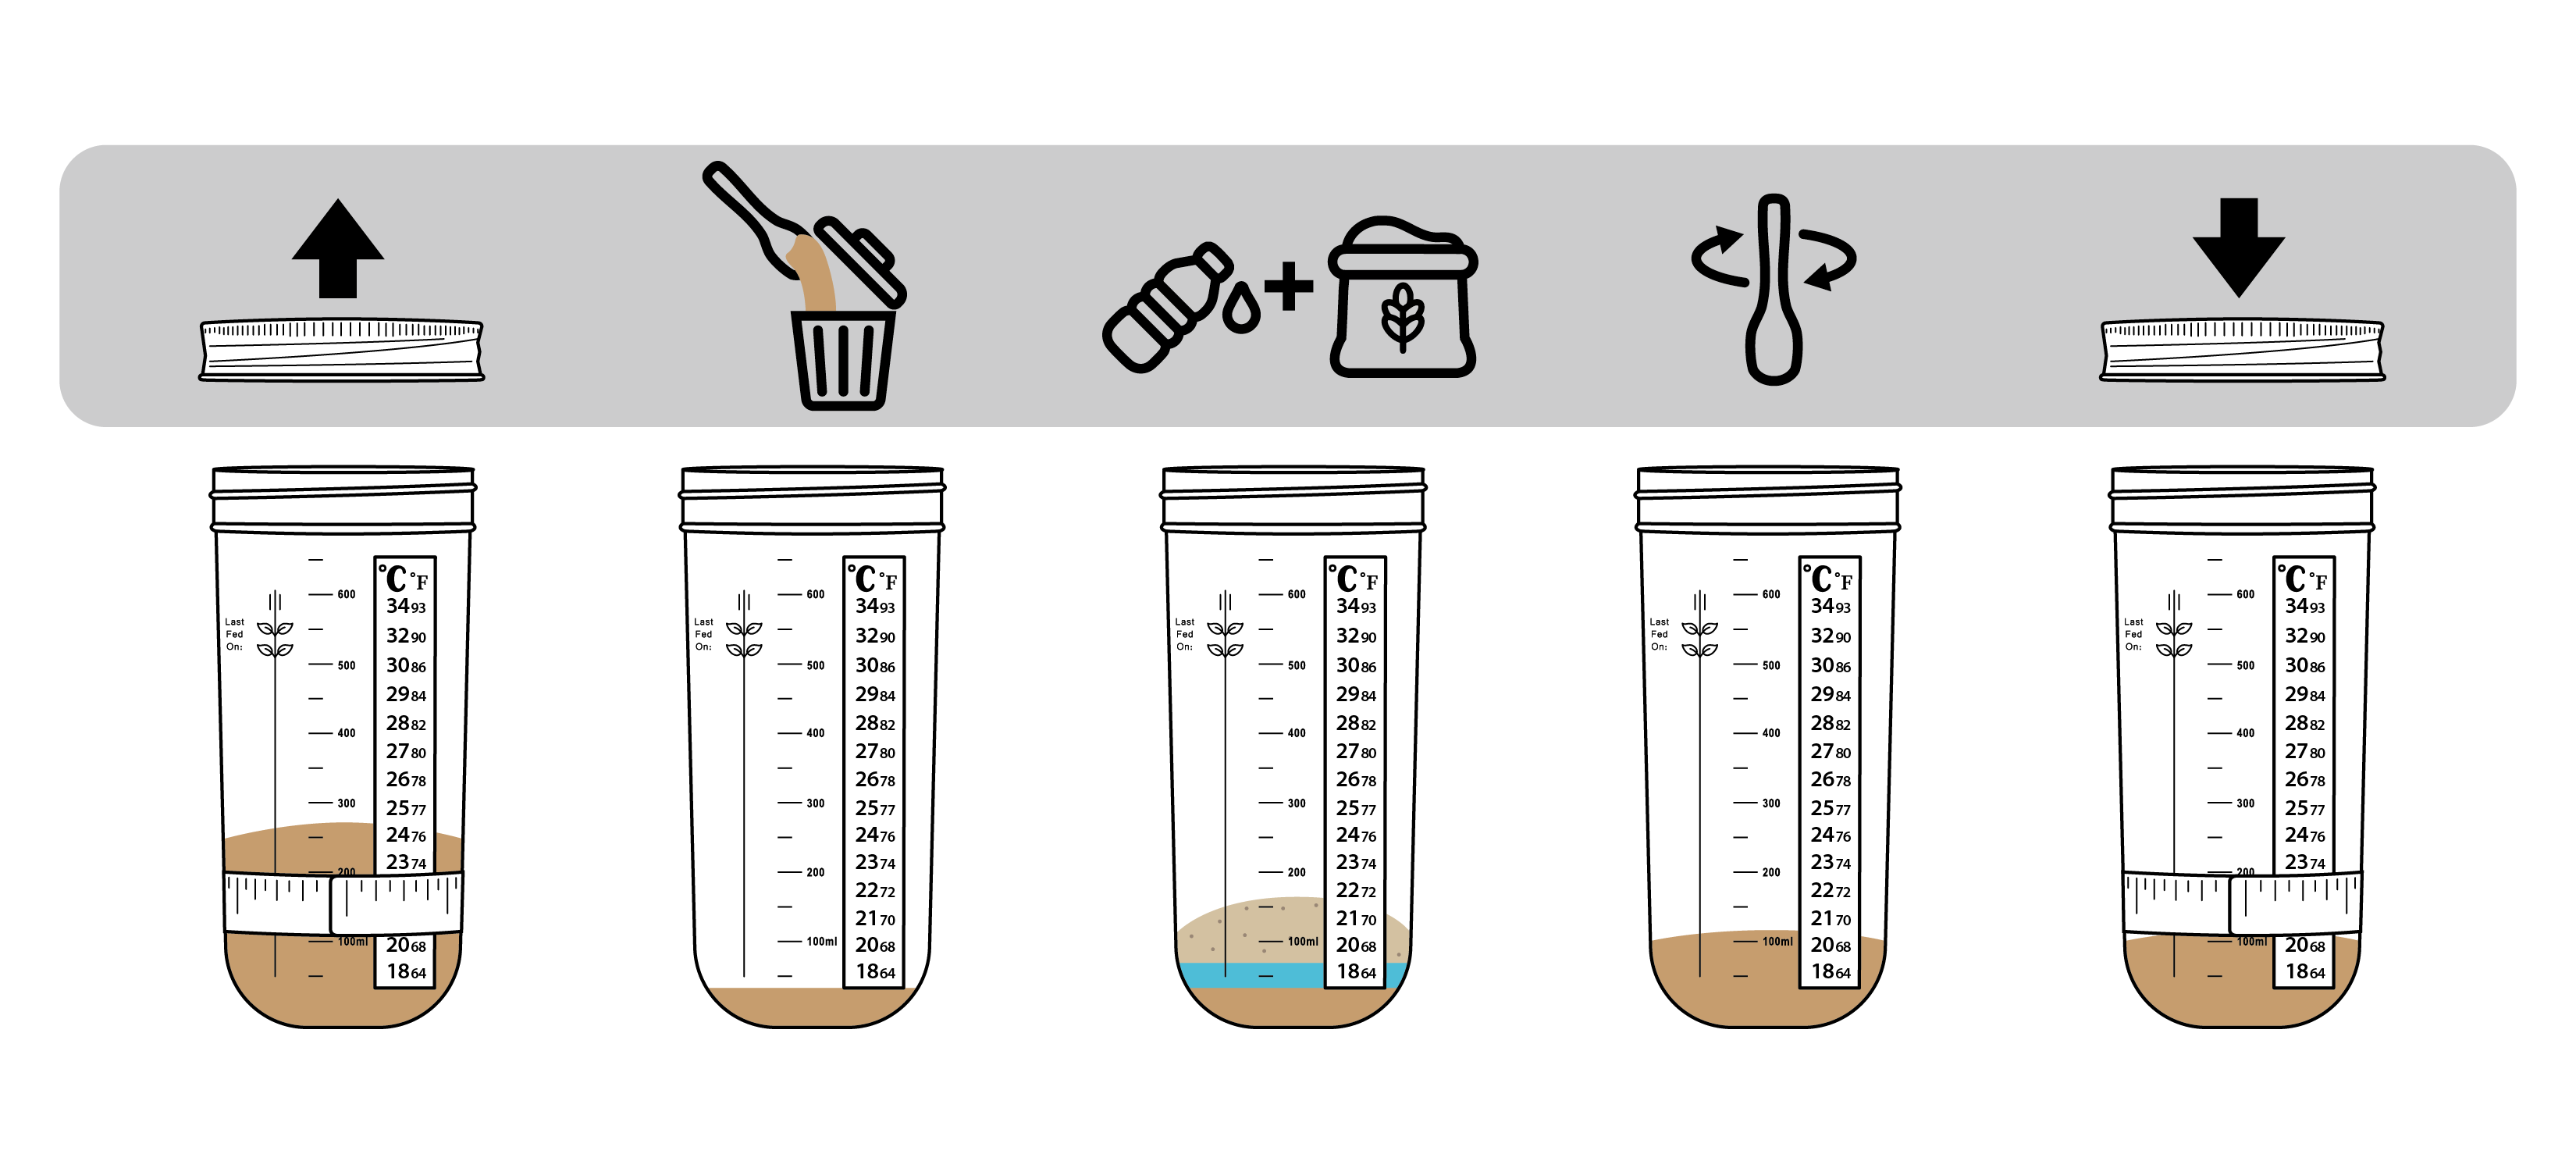
- Step 1: At peak, remove the lid. Your total starter should equal 125g.
- Step 2: Discard 100g of starter, or enough so that only 25g remains in the jar. Pro tip: Don’t pour large amounts of starter down the sink—it can harden and clog your pipes. Compost it, bake with it, or toss it in the trash instead. Remember to use cold water when cleaning starter off your tools and jar. Hot water will essentially bake the water and flour mixture onto surfaces and harden.
- Step 3: Add 50g water and 50g flour to feed. We recommend a 50/50 blend: 25g whole wheat flour + 25g unbleached bread flour.
- Step 4: Using a silicone spoonula, stir well until no dry spots remain. The mixture should form a thick, wet paste that is similar to pancake batter. Scrape down the sides of the jar for a clean rise.
- Step 5: Loosely cover the jar with the lid (don’t tighten it). Mark the starting height with an elastic band to track the rise.
- Step 6: When your starter reaches peak and passes the “Rise Test,” it’s ready to use!
- To Use: Gently pour it from the jar into your mixing bowl, using your spoonula.
Learn more about when and how to feed your starter here.
Temperature and Its Effect on the Timeline
Temperature plays a major role in how quickly a starter develops. Warm environments (around 75–78°F) encourage faster fermentation, while cooler kitchens slow everything down. A cool starter is not weak, it simply makes the process slower.
Consistency matters more than warmth. Avoid placing starters in ovens with lights on (as it can be easy to forget and preheat the oven) or near heat sources that could overheat and kill the culture. If your starter reaches 130°F, that will kill the yeast. If it is below 130°F, you still have a chance to save it, just feed it normally and keep it in a safer location. Tracking temperature, as you can with the starter jar in the Simply Sourdough Kits, helps you understand why your timeline may differ from someone else’s.
Hooch vs. Water Separation: What’s the Difference?
Clear liquid in a sourdough starter often causes concern, but appearances can be misleading. In young or weak starters, clear liquid is usually water separation, which simply means the mixture needs time or a good stir.
Hooch, on the other hand, is alcohol and only forms in a mature, established starter that has fully consumed its food. Both can look identical, but hooch does not occur during early starter creation. When you see clear liquid in the first week, stir it back in and keep going.
Mold: When to Start Over
Mold is one of the few true deal‑breakers when making a starter. If you see fuzzy growth, especially grey, green, or black, you should discard the starter entirely, clean your tools, and start fresh.
Mold is most likely to appear in the first 7–10 days, before acidity builds enough to protect the culture. After a starter is established, mold becomes far less common. This should not be a big issue as long as your starter is covered with a non-porous lid, like the one found on the jar from the Simply Sourdough Kits.
When to Start Storing and Baking with Discard
Discard from a new starter should not be saved or used for baking until the starter is fully established and reliably rising. In the early days, the microbial balance is unstable and may include undesirable bacteria.
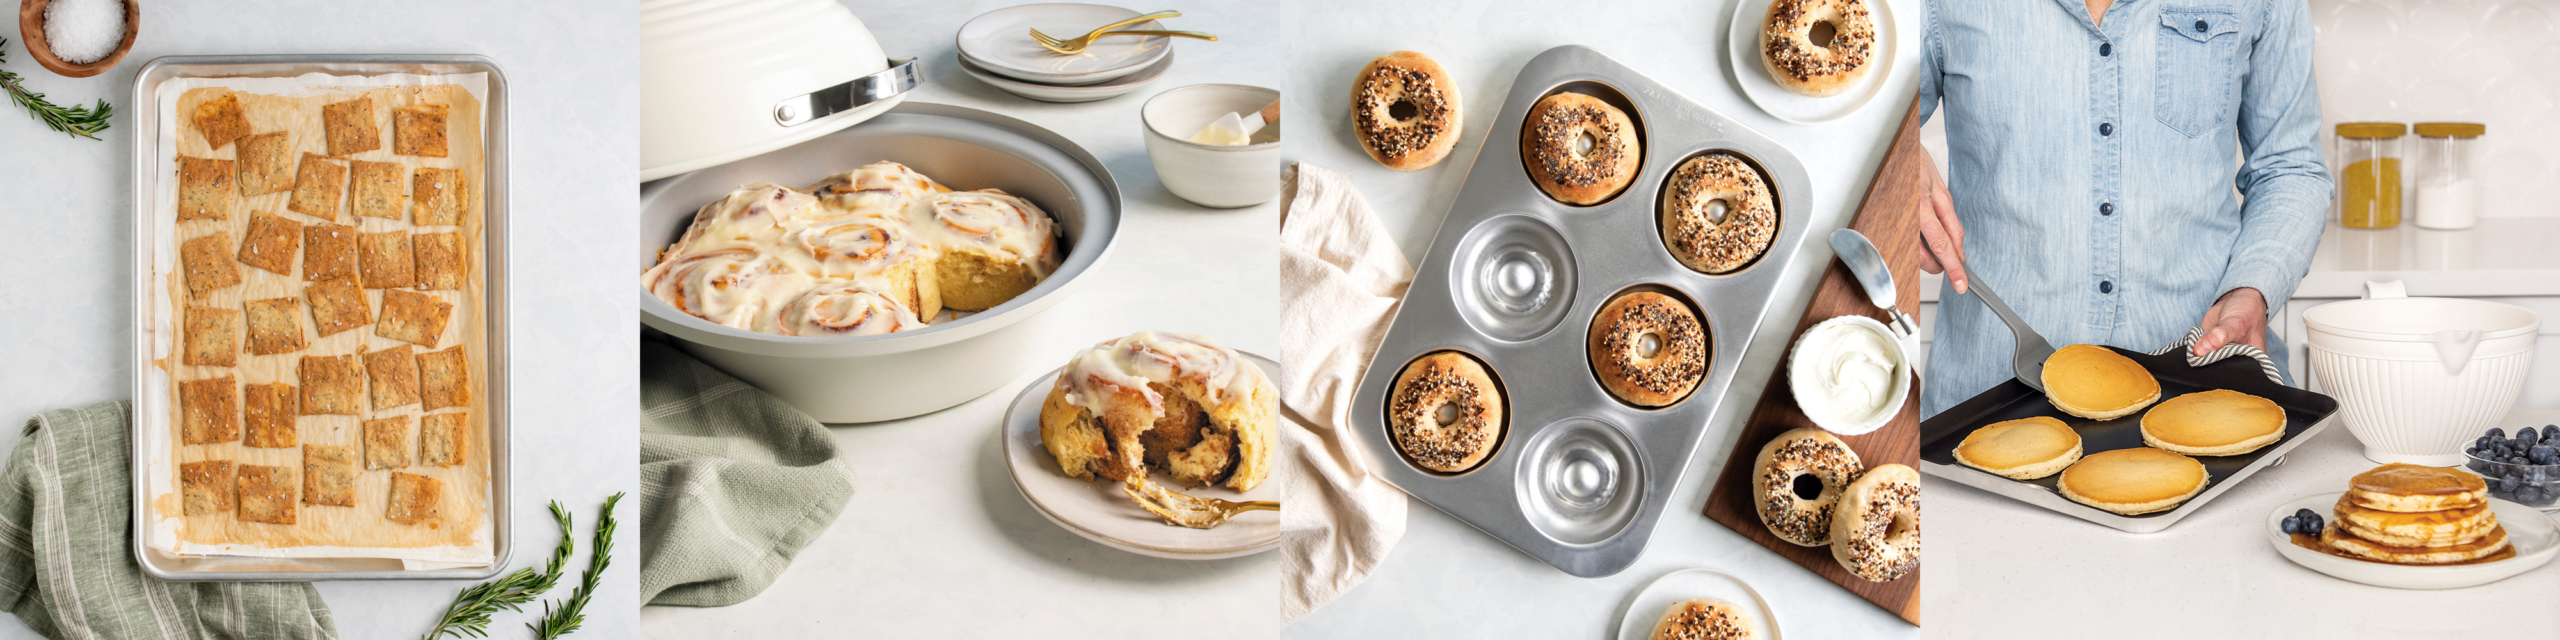
Wait until your starter consistently doubles within several hours after feeding before using discard in recipes. Once mature, discard becomes a valuable ingredient for pancakes, crackers, waffles, and more.
Check out our favorite sourdough discard recipes.
When Is a Starter Ready to Bake?
A sourdough starter is ready when it can roughly double in volume within 4–7 hours after feeding, at room temperature, for several days in a row. Speed matters more than height. Some starters never double but are still strong if they rise quickly.
Once ready, you can confidently move from fermentation to baking.
From Starter to Loaf: Why the Right Tools Matter
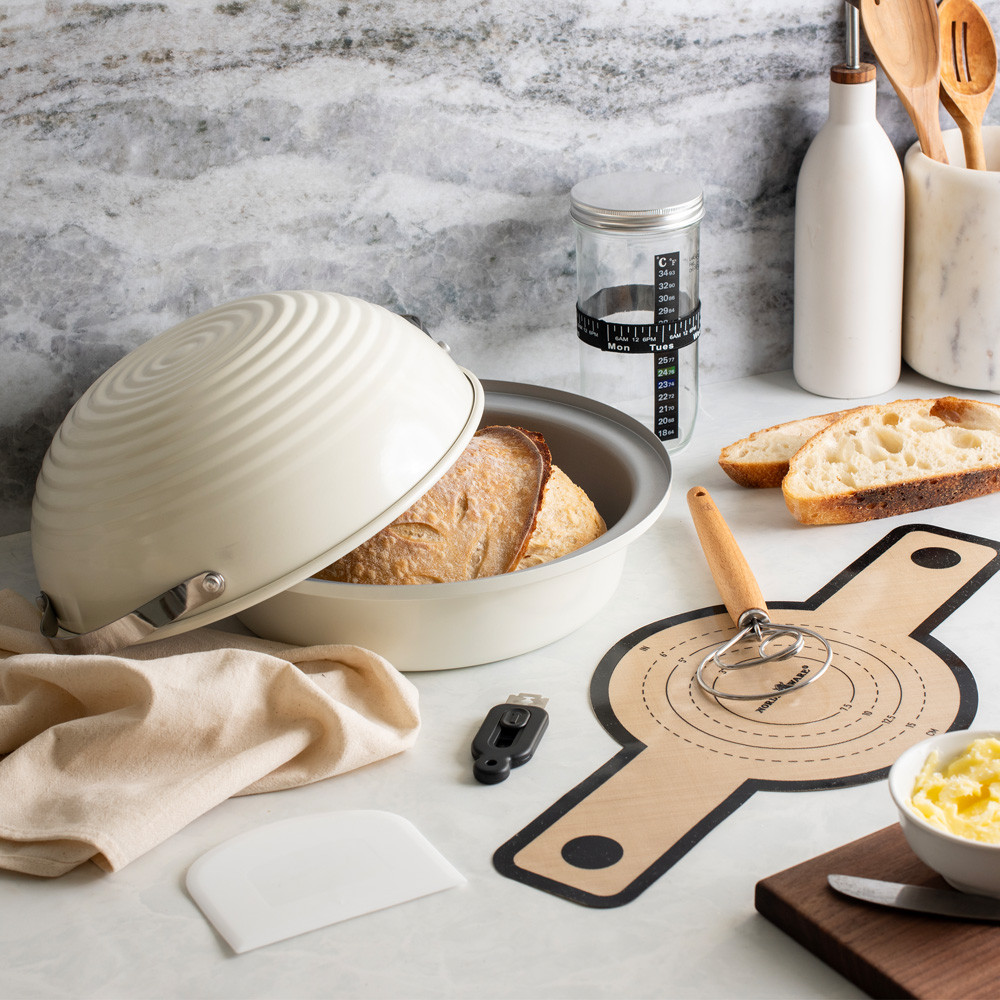
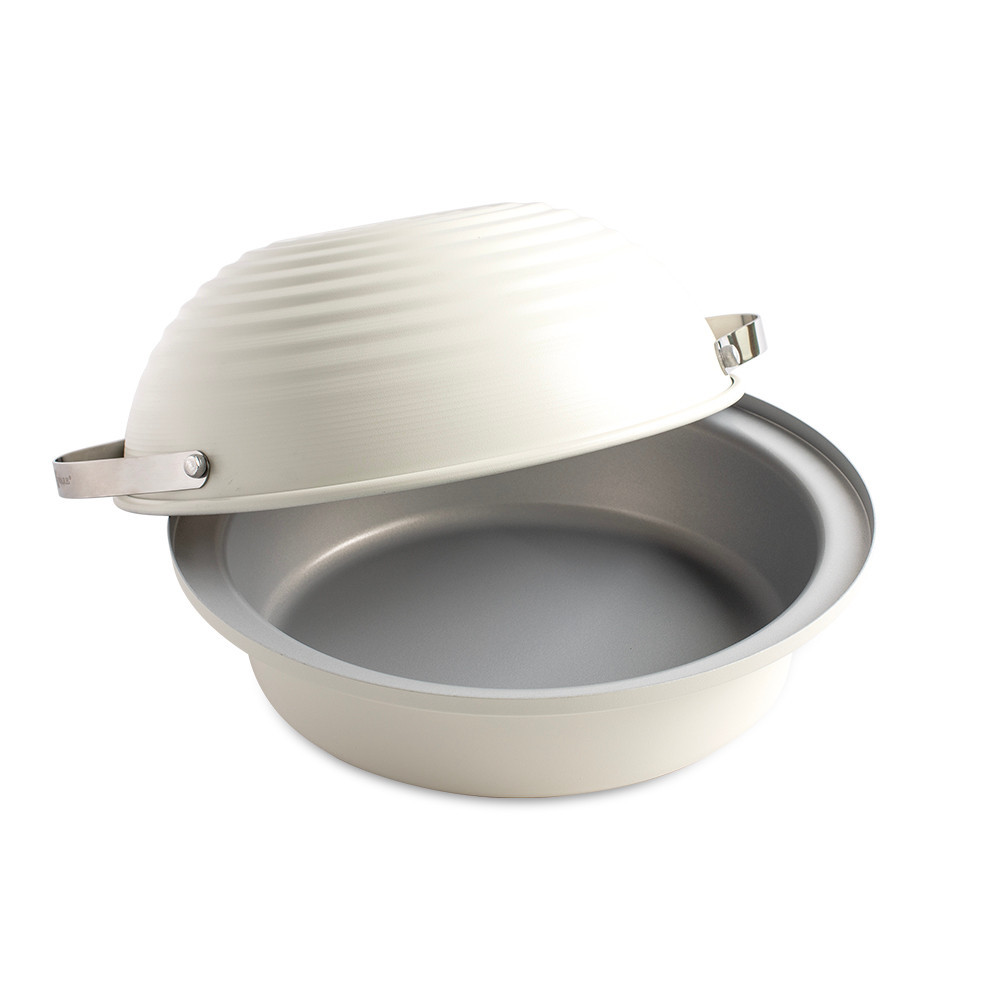
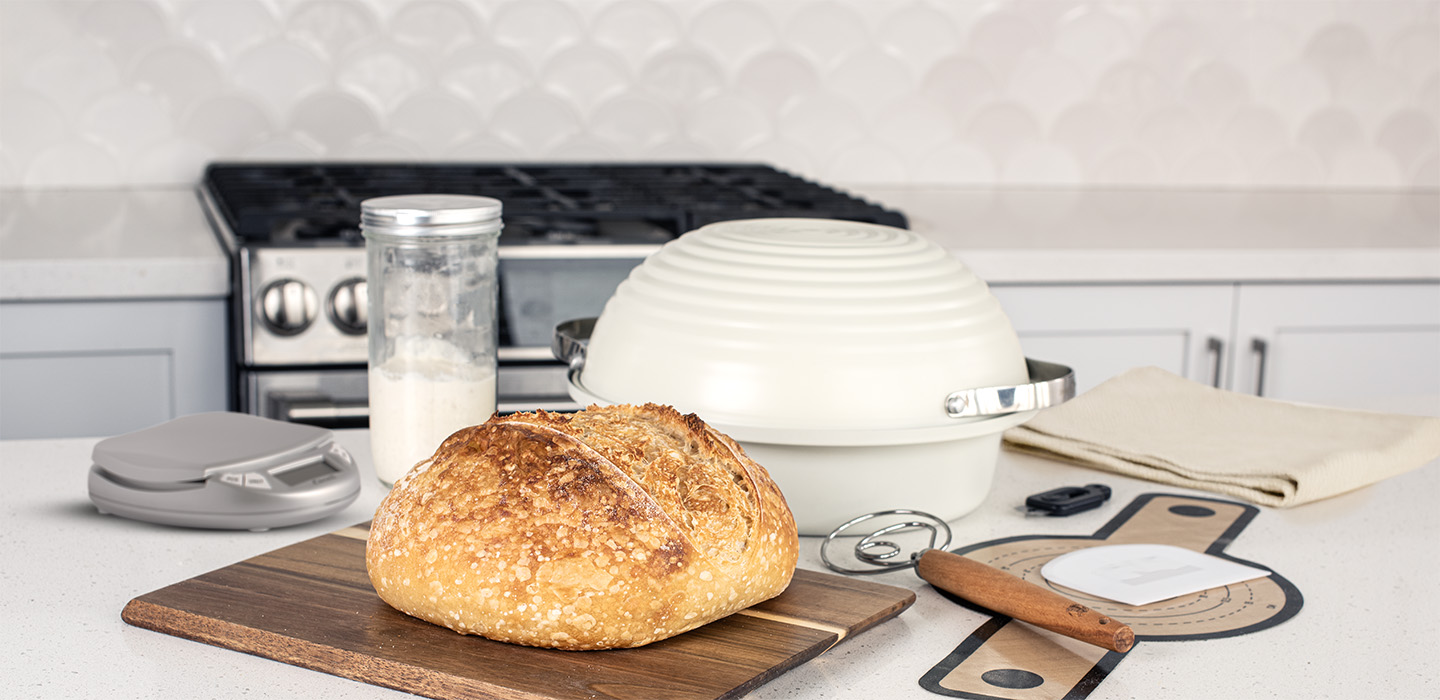
Transitioning from an active starter to a successful loaf is much easier when your tools are designed for sourdough. The Deluxe Simply Sourdough Bread Baking Kit features all of the tools you need to bake sourdough bread at home including a lightweight aluminized‑steel baking pan and lid that traps steam like cast iron, without the unnecessary weight or preheating.
The lid doubles as a proofing vessel, while including tools like the Danish dough whisk, bench scraper, silicone lifting sling, and retractable bread lame support every step from mixing to scoring. The kit also features a quick-start guide that includes step-by-step instructions and proven recipes to kickstart your sourdough success. Instead of piecing things together, the kit creates a smooth journey from starter to slice.


Frequently Asked Sourdough Starter Questions
What if my starter smells bad?
Strong or unpleasant odors in the first week are normal. Smell improves as yeast takes over.
Can I speed up my starter?
It is not recommended to try to speed up the process to establish a brand new starter from scratch. The wild yeast and bacteria need time to create a stable environment within your typical house ambient temperatures.
When building your starter for a recipe there are methods you can employ to speed up the time in which your starter will be ready to bake with. You can warm up your starter if you have a proofing box or dedicated starter home device by setting the temp to be 75-80°F. You can also warm the filtered water you will use to build the starter for your recipe between 80-100°F. Make sure to use a temperature probe to test the warm water for accuracy.
Is my starter dead if it stops bubbling?
Rarely. Unless you are trying to create a starter from scratch and it has been inactive from the first day you mixed the flour and water, then try again and make sure you are using fresh flour and filtered water. If you are just in the middle of maintaining an established starter, refer to the When and How to Feed a Sourdough Starter chart to see if you need to refeed your starter or if you just need to wait for it to rise based on the last time you fed it.
Should I use sugar, honey, or yeast?
No. Flour and water are all that’s necessary to maintain a starter.
Final Thoughts
Making a sourdough starter from scratch is a lesson in patience, observation, and trust in fermentation. Whether you grow your own starter or begin with one shared by your community, the goal is the same: a strong culture that supports great bread.
With thoughtful tools like the Simply Sourdough Bread Baking Kit, you can remove uncertainty, learn faster, and focus on the joy of baking bread at home.
)