How to Maintain a Sourdough Starter: Easy Tips for a Healthy Starter
Every great sourdough bake begins with a strong, healthy starter. Whether you’re just getting started or looking to perfect your routine, this guide covers all the essentials of sourdough starter maintenance: feeding schedules, storage tips, signs of health, and simple troubleshooting.
What Is a Sourdough Starter?
A sourdough starter is a live culture of wild yeast and lactic acid bacteria that leavens dough and creates a tangy, complex flavor. Yeast feeds on flour and water, producing gases that cause bread to rise. But because it’s alive, it needs regular feeding and proper care to thrive.
Where to Get a Sourdough Starter
You can start from scratch using just flour and water or obtain one from a friend, bakery, or online shop. Dry or active starters are widely available and easy to revive with regular feedings.
Feeding Your Starter: When and How
When:
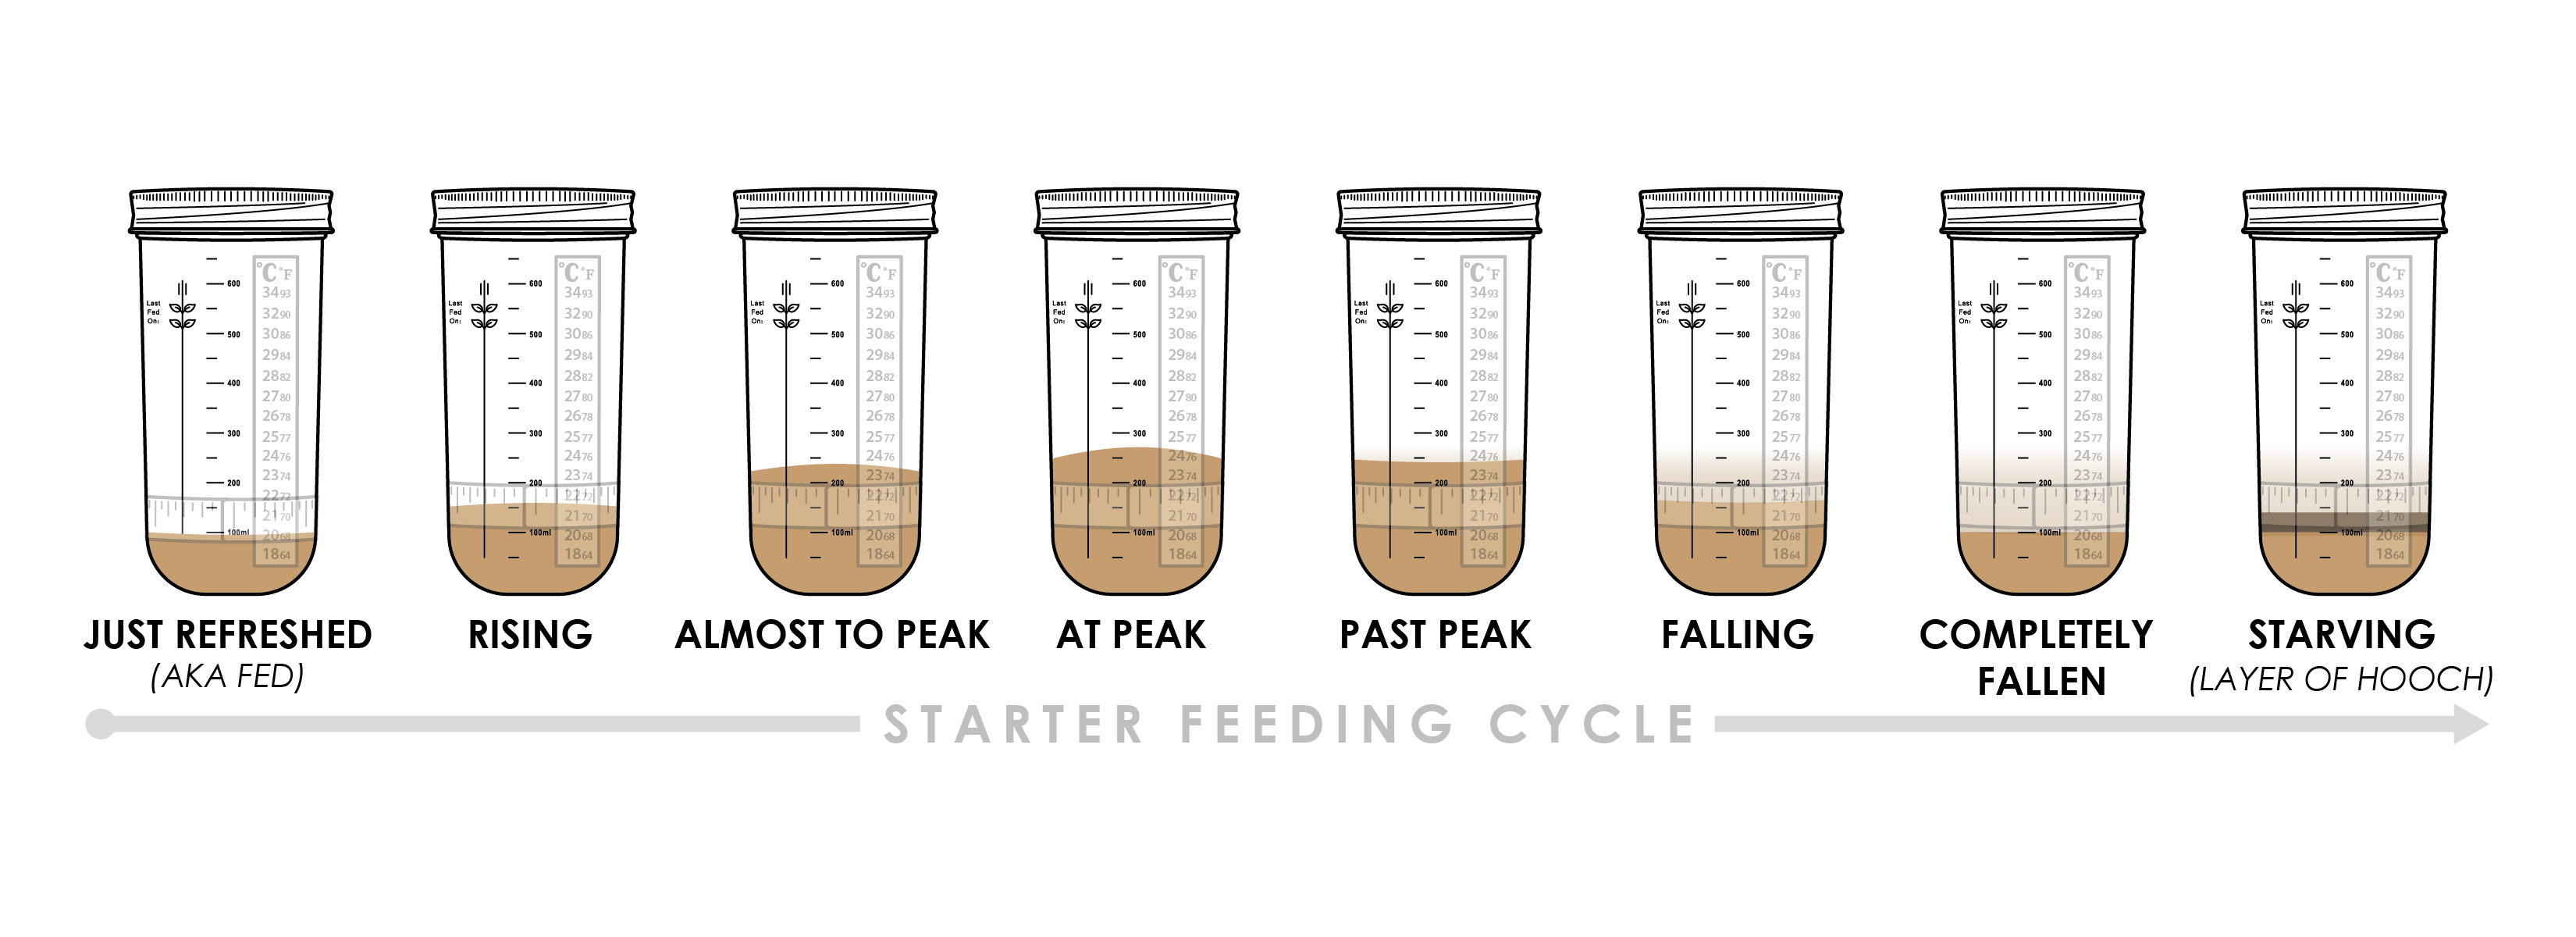
It’s important to feed (aka refresh) your starter regularly by discarding most of it and feeding it fresh flour and water. This helps balance the activity of the yeast and lactic acid bacteria, preventing the starter from becoming too acidic.
When the yeast runs out of food (i.e., flour), the lactic acid bacteria take over, making the starter more acidic. This stifles yeast reproduction and CO₂ production. A highly acidic starter can lead to overproved loaves and a sour, unpleasant flavor. To reduce acidity, refresh your starter “at peak” activity (see diagram below for reference) with a 1:2:2 ratio (starter:water:flour) until it smells less sour and more sweet and yeasty. This may require multiple feedings per day if your starter is kept at room temperature.
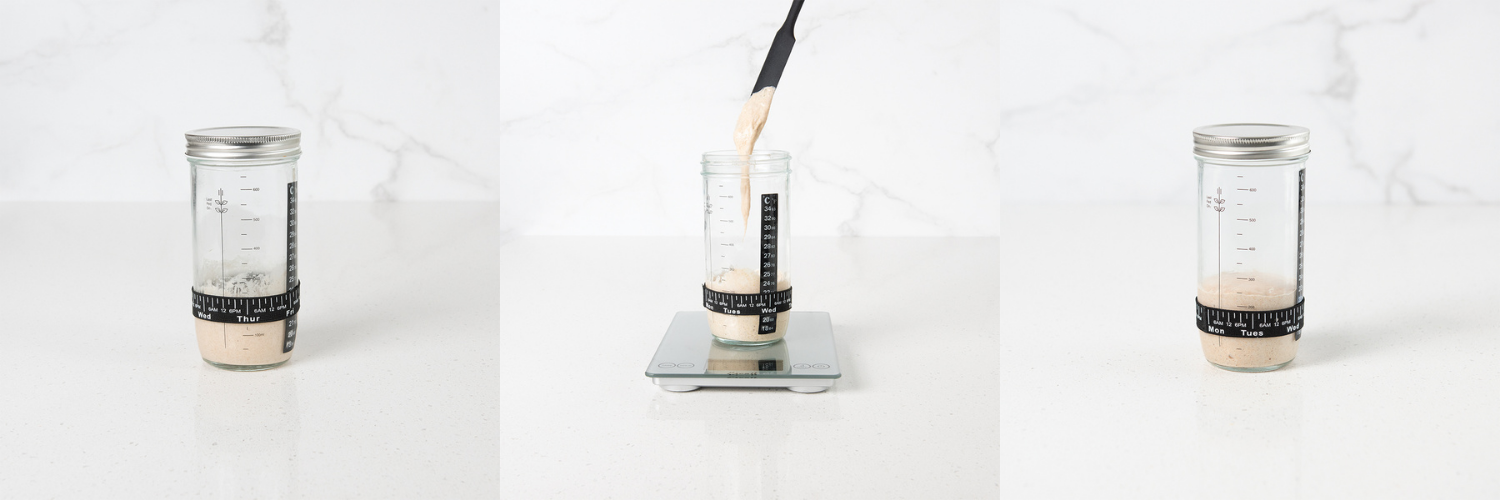
 How:
How:
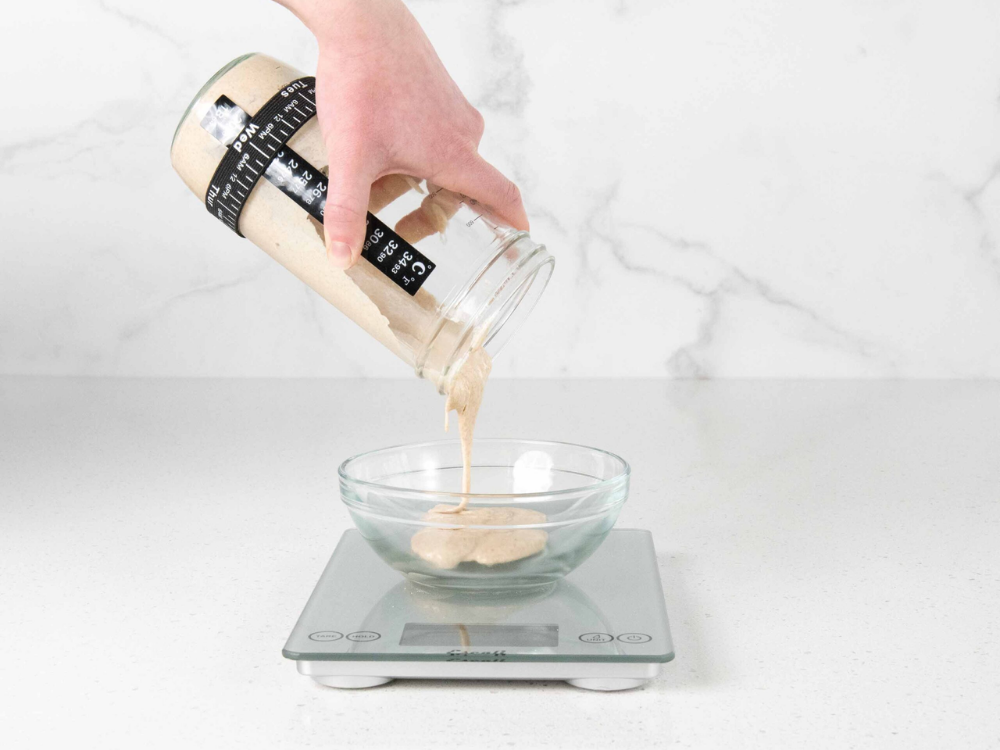
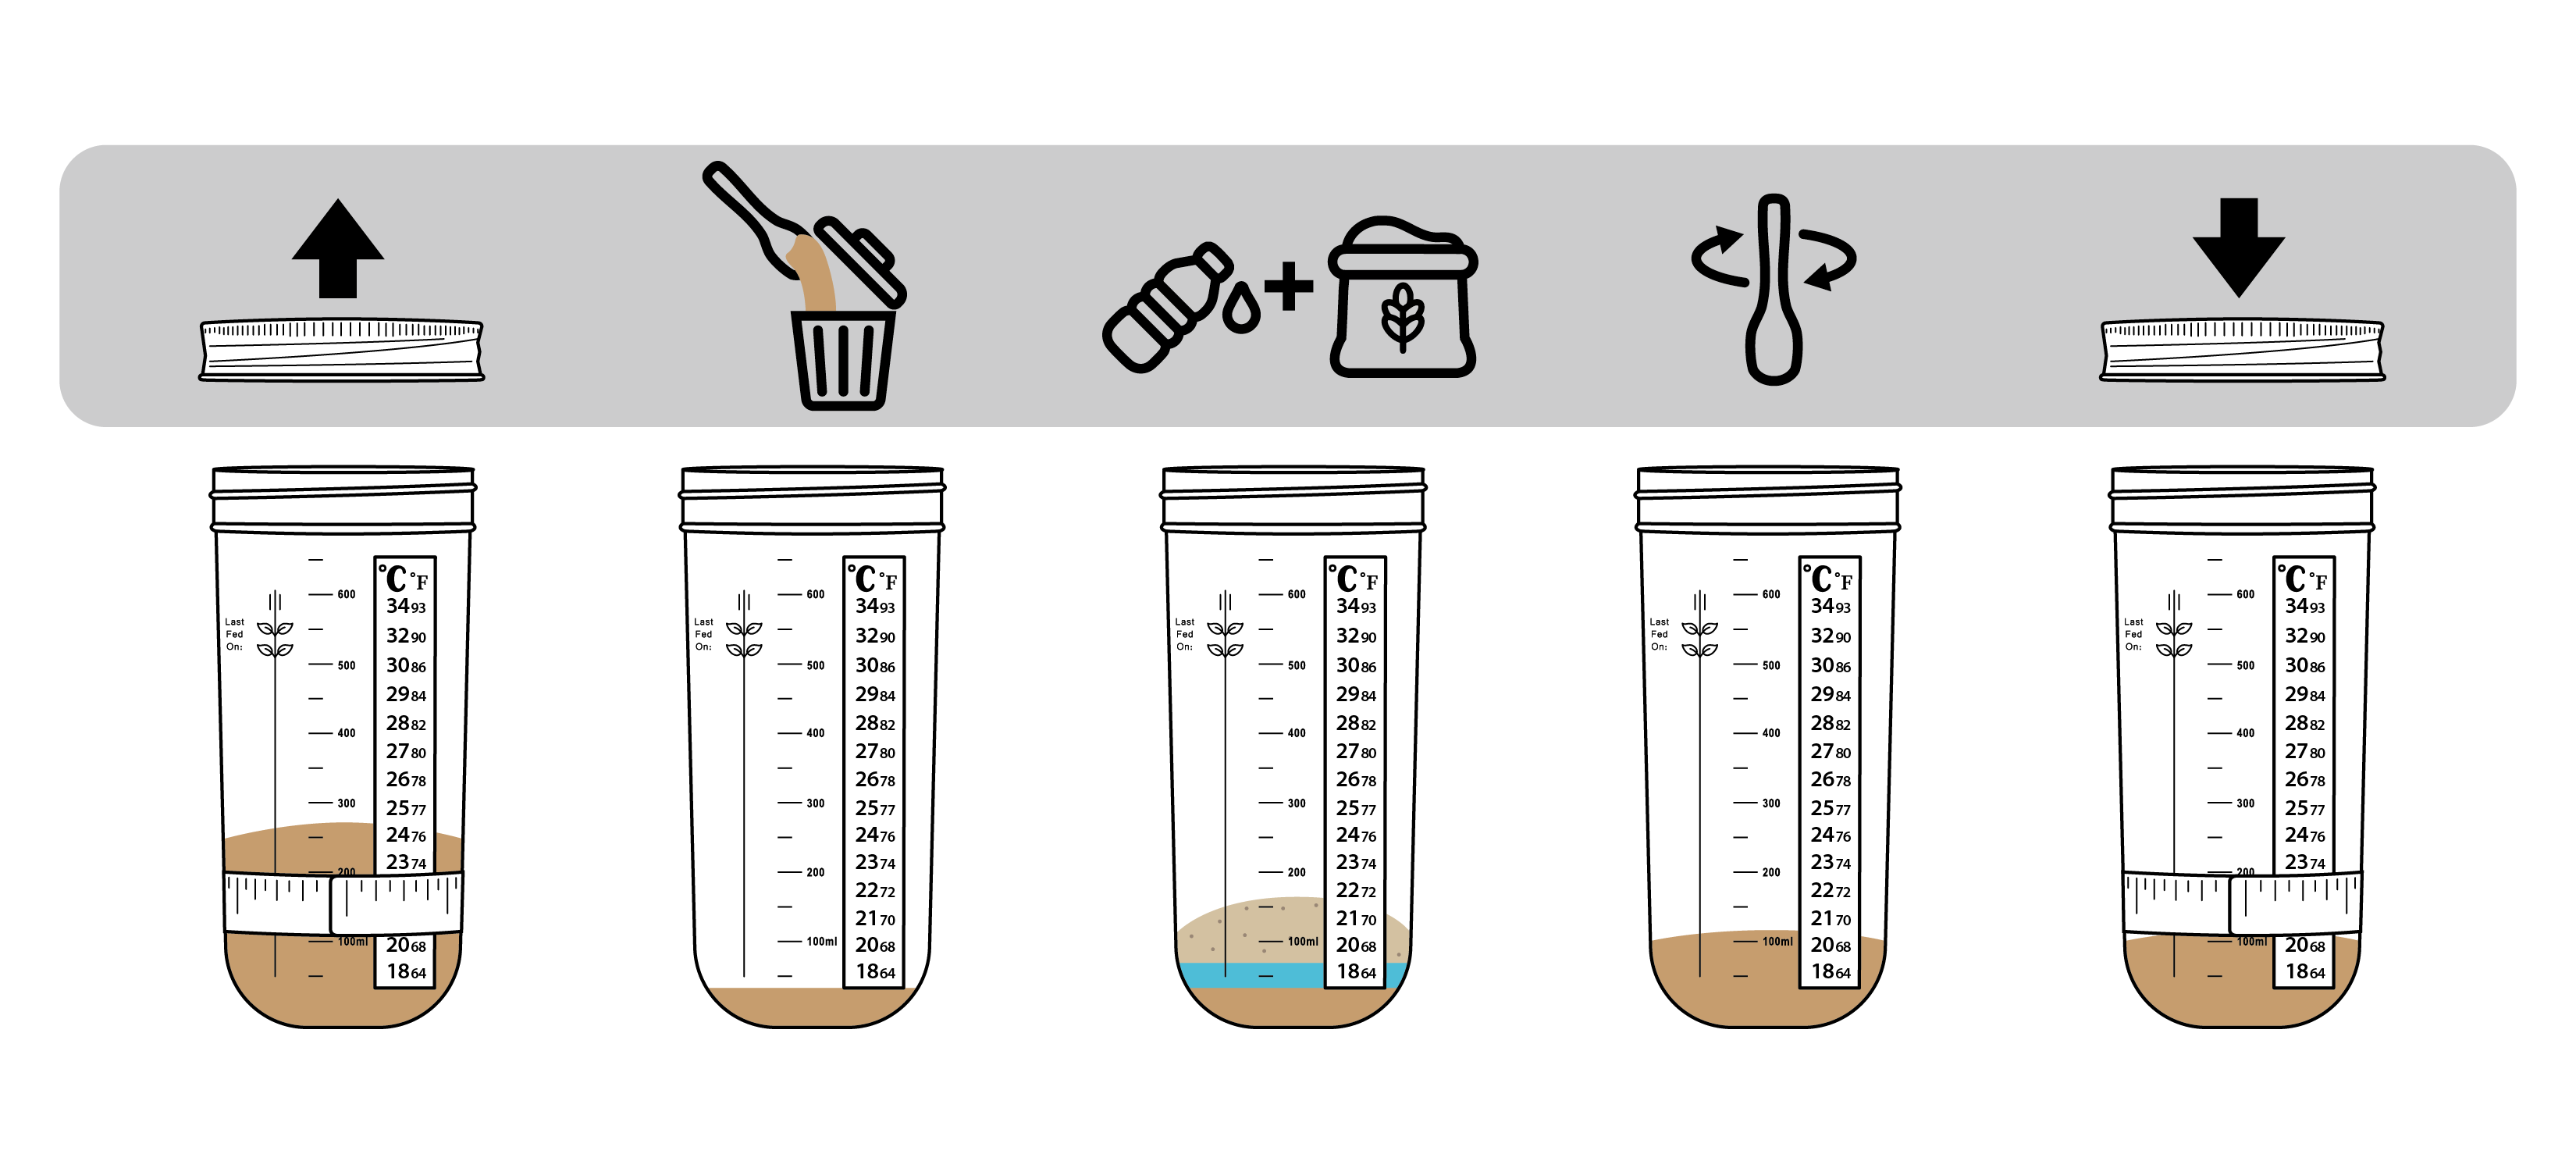
- Step 1: At peak, remove the lid. Your total starter should equal 125g.
- Step 2: Discard 100g of starter, or enough so that only 25g remains in the jar. Pro tip: Don’t pour large amounts of starter down the sink—it can harden and clog your pipes. Compost it, bake with it, or toss it in the trash instead.
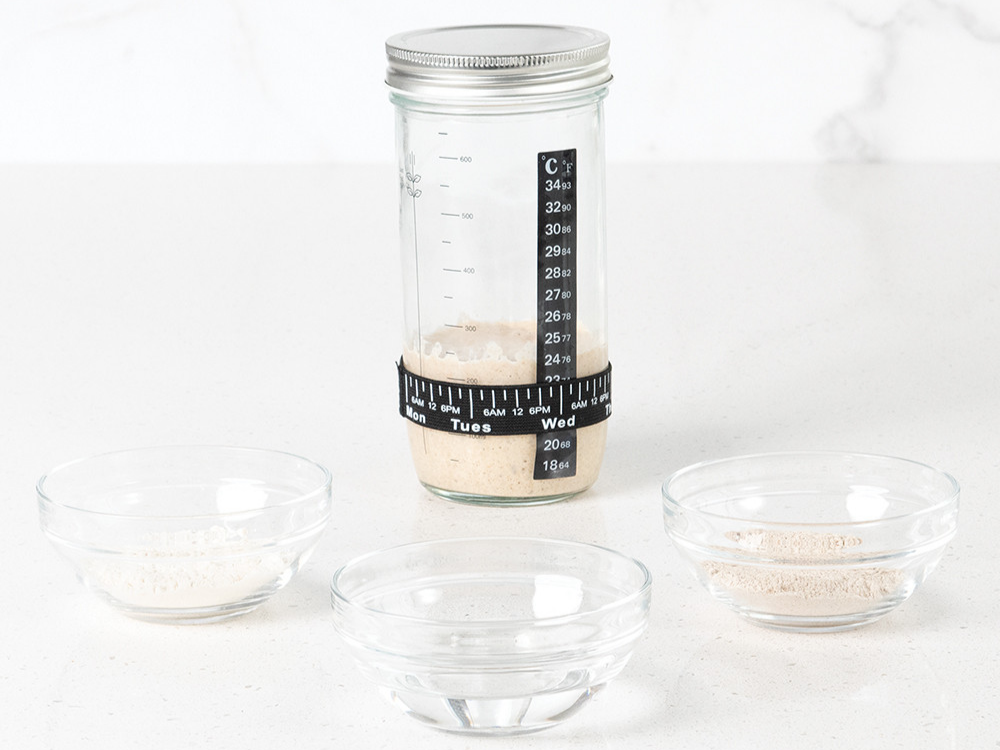
- Step 3: Add 50g water and 50g flour to feed. We recommend a 50/50 blend: 25g whole wheat flour + 25g unbleached bread flour.
- Step 4: Using a silicone spoonula, stir well until no dry spots remain. The mixture should form a thick, wet paste—similar to pancake batter. Scrape down the sides of the jar for a clean rise.
- Step 5: Loosely cover the jar with the lid (don’t tighten it). Mark the starting height with an elastic band to track the rise.
- Step 6: When your starter reaches peak and passes the “Rise Test,” it’s ready to use!
- To Use: Gently pour it from the jar into your mixing bowl, using your spoonula to help guide it out without deflating.
What is the Rise Test?
After each feeding (also called a “refreshment”), your starter should double in size and reach its peak within 6–10 hours, depending on your kitchen’s temperature.
To pass the Rise Test, your starter must:
- Double and peak consistently within that 6–10 hour window
- Do this for three consecutive days with at least two feedings per day
Once your starter meets these conditions, it’s strong, active, and ready to bake with!
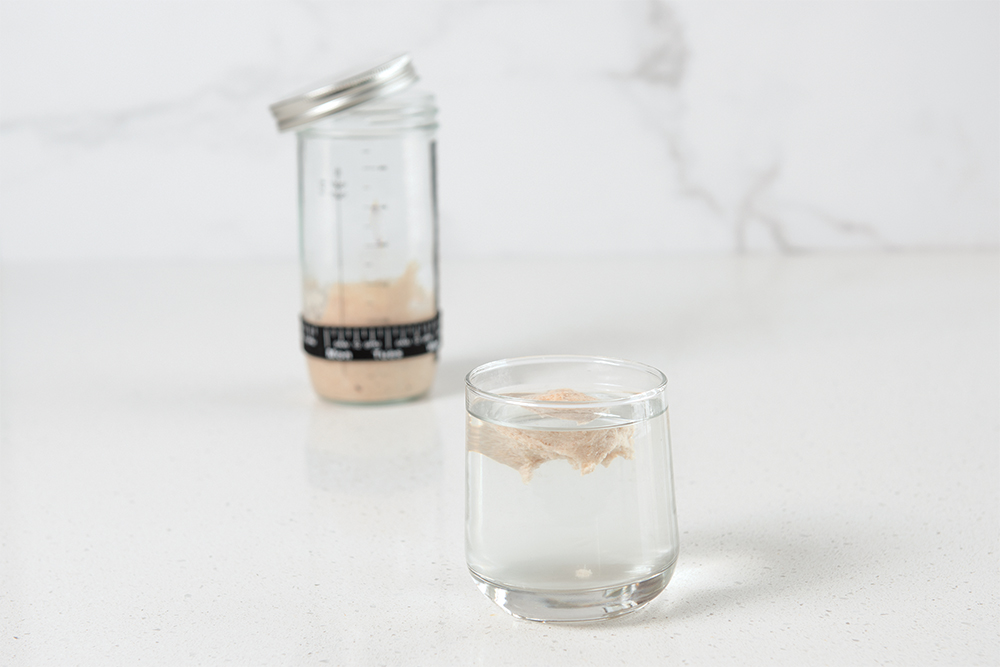
 The Float Test (Optional)
Want be certain that your starter is ready to bake with? Try the float test. Drop a spoonful of starter into a glass of water. If it floats, it’s airy and active enough to leaven your dough. If it sinks, it may need another feeding or more time to ferment.
Feeding Ratios and Flour Choices
- Common Ratios: 1:1:1, 1:2:2, or 1:5:5 (starter:water:flour). The larger the ratio (ex. 1:5:5), the longer it will take for your starter to “peak”. A 1:2:2 ratio is great for reducing acidity and creating a sweet-smelling, bake-ready starter.
- Best Flour for Feeding: A 50/50 blend of whole wheat and bread flour works well. Whole wheat encourages wild yeast growth; bread flour offers easy-to-digest sugars and strong gluten for rise. When purchasing your flour, look for a protein percentage between 12-14% such as King Arthur Bread Flour or Whole Wheat Flour.
- Listen to Your Starter: Your starter will tell you what it needs. If it smells overly sour, adjust your feeding ratio. If it’s sluggish, warm up your environment or increase feedings. Flexibility is key to success.
Signs of a Healthy Starter
- Bubbles throughout mean the yeast is active.
- Tangy smell (like yogurt or sour beer) is a good sign.
- Doubling in size within 4–8 hours is ideal.
- Float Test: If a spoonful floats in water, it’s airy and ready.
Common Problems & Troubleshooting
Sourdough starters are surprisingly sturdy, but they can raise a few questions along the way. If yours looks or acts a bit off, don’t worry, here are answers to some of the most common questions to help you get your starter back to its best.
What is that cloudy dark liquid on top on my starter? Did I kill my starter?!
Not at all, that liquid on top of your starter is know as Hooch. Hooch is liquid layer that forms on the top of an established Starter, that is produced by the yeast, as a byproduct of fermentation. The presence of this liquid means that the yeast cells have consumed all the flour and is starving. Hooch can be stirred into your starter or poured off before feeding.
How do I know if my sourdough starter is actually dead?
True starter death is rare, but if you spot mold (fuzzy patches, especially in pink, orange, or green), it’s safest to throw it out and start fresh. A change in smell can also be a red flag—if your starter smells rotten, cheesy, or like dirty socks, it may be beyond saving.
My starter stopped doubling, what happened?
If your starter was once rising reliably and now seems sluggish, there are a few things to check:
- Smell: If it smells overly sour or off, it may need more frequent feedings.
- Feeding Routine: Try feeding it more often or switching to a 1:1:1 ratio (equal parts starter, flour, and water by weight) to reset its balance.
- Temperature: Starters are happiest in warm environments—ideally between 70–78°F. If your kitchen is cooler, it may take longer to ferment. Try moving it to a warmer spot or insulating it slightly.
- Flour: Switching up your flour type (like using a higher protein flour) or adjusting your feeding ratio can help bring your starter back to life.
Remember: sourdough starters are forgiving. A little troubleshooting goes a long way, and with patience and a few adjustments, most issues can be easily resolved!
Advanced Maintenance: Long-Term Storage
For those times when you’re not baking as often or need a break from your sourdough starter, long-term storage is a great option. Whether you’re going on vacation, taking a break, or just want to preserve your starter for later, here’s how to keep it alive and ready for future baking:
- How to Dry or Freeze Your Starter
If you won’t be baking for a while but don’t want to lose your starter, drying or freezing it is an effective solution. To dry your starter, simply spread a thin layer of it on parchment paper and let it air-dry for a few days. Once fully dried, break it into small pieces and store it in an airtight container. To freeze, portion your starter into small containers or ice cube trays and freeze for later use. - Tips for Vacations or Busy Seasons
If you’re heading out of town or know you won’t be able to maintain your starter regularly, it’s a good idea to store it in the fridge. Refrigerating your starter slows down its activity, so you won’t need to feed it as frequently. Before storing, give it one last feeding and make sure it’s in a tightly sealed container. When you return, simply bring it back to room temperature and resume feeding. - Rehydrating and Reviving Tips
When you’re ready to get your dried or frozen starter back into action, it’s easy to revive it. For dried starters, simply add water and flour and let it sit at room temperature for 24 hours, feeding it regularly. For frozen starters, let it thaw in the fridge overnight, then begin feeding it daily until it becomes active and bubbly again. Be patient, as it may take a few feedings to get it back to full strength!
By using these long-term storage methods, you can ensure your starter is ready whenever you need it, no matter how much time passes between bakes!
Final Tips for Success
Maintaining a healthy sourdough starter is an ongoing process that rewards patience and consistency. Here are a few final tips to help you succeed on your sourdough journey:
- Be Patient and Consistent
Sourdough starters are living cultures, and they take time to thrive. Don’t be discouraged if things don’t happen overnight. Stick with it, and try to feed your starter on a regular schedule. Consistency will help you see the results you’re looking for, so trust the process and enjoy the journey. - Keep a Log or Use Reminder Apps
Keeping track of your feeding schedule and any changes in your starter can make a huge difference. Consider using a notebook, a tracking band, or an app to log the day, time, and any observations. If you tend to forget when it’s time to feed, reminder apps can be a lifesaver, ensuring you stay on top of the care your starter needs. - Don’t Stress About Perfection
Sourdough is as much an art as it is a science, so it’s okay if things don’t always go perfectly. Starters are forgiving, and small inconsistencies won’t ruin your bread-making efforts. Instead of aiming for perfection, focus on learning and adjusting as you go. Over time, you’ll develop a deeper understanding of your starter and how it reacts to different environments and routines.
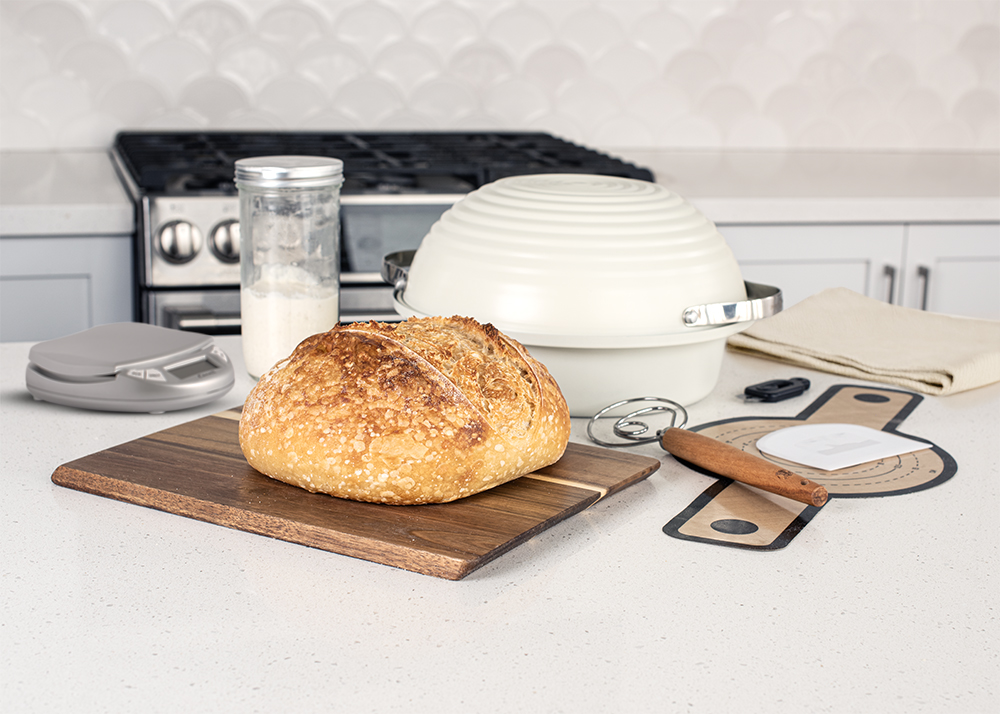
With these final sourdough starter tips, it’s time to mix up some sourdough bread! Our Basic Simply Sourdough Kit has all of the tools that you need to make artisan bread at home and includes a quick start guide with tips and tricks, recipes, and step-by-step instructions to get you started on your bread baking journey today. For more accurate measurements and precise results, the Deluxe Simply Sourdough Kit includes all the tools from the Basic Kit, plus an Escali Digital Baking Scale.
Learn more about both of our Simply Sourdough Bread Baking Kits!

