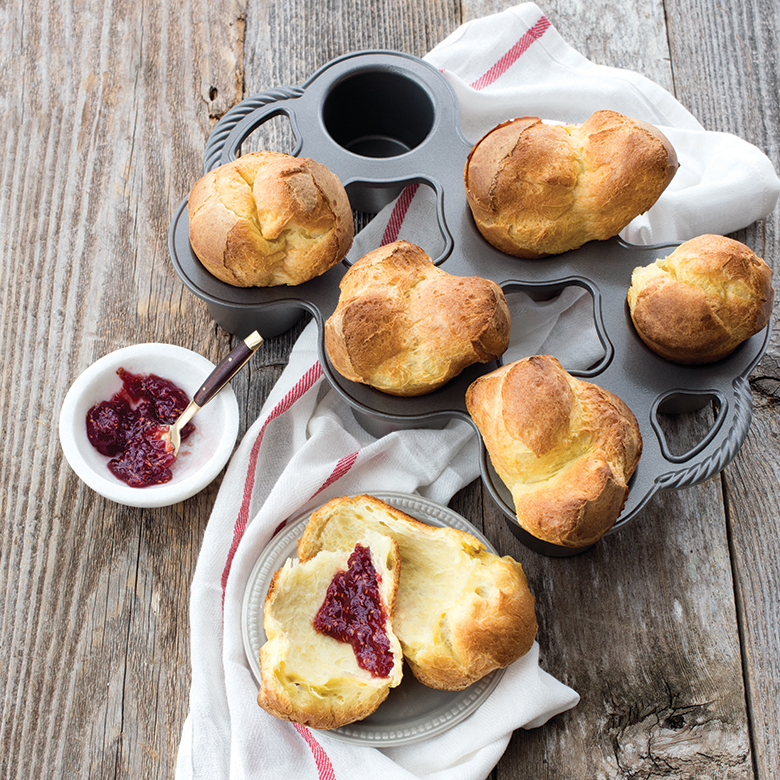
Popovers are easier than you think
For some quick drama at the dinner table, you can’t beat popovers. When these puffy, golden, odd-shaped orbs emerge from the oven you look like a genius in the kitchen! And they’re really very easy to make, once you have the right recipe, the right technique and the popover pan from Nordic Ware.
When I first began making popovers, I did some research (I confess, sometimes that’s as much fun for me as the baking). I discovered that most recipes are very similar. After all, there are few ingredients – eggs, milk, butter, flour and salt are all that go into these beauties. But, there are very differing opinions on the technique to use to achieve the beautifully browned, TALL popovers that are the ideal.
I found recipes that insisted all ingredients, including eggs and milk, be warmed before mixing. Some insisted on super high heat ovens, that the popover pan be preheated, and still others that the pan be placed on a baking stone for preheating and then baking. Lots of that made sense because popovers get some of their “rise” from an initial blast of heat – the heat turns the moisture in the batter into steam and the popovers begin their expansion process. All the recipe writers agreed that letting the batter rest for 30 minutes or so before baking was a good idea. The gluten relaxes its tight hold and the batter can better stretch and expand, helping further with the rising process. But, some of the recipe techniques looked incredibly time consuming or required special ingredients. I wanted simple so I kept researching.
Other reliable sources I checked agreed that resting time for the batter and high heat for part of the baking time were key but said the ingredients could be chilled or unchilled and that you could use regular all-purpose flour instead of bread flour. Now I was getting somewhere.
The last important bit of technique to know is to whisk your batter until it’s smooth before you let it rest. Since you are letting the batter rest, you don’t risk overdeveloping the gluten and you’ll get a lighter, airier texture. Let’s get started.
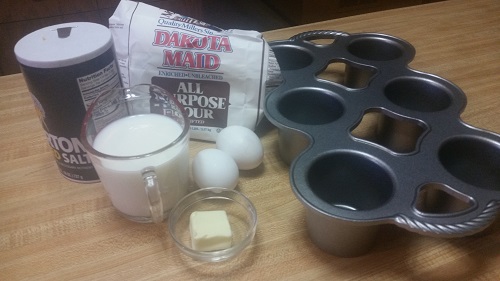
Ingredients
- 2 large eggs
- 1 cup milk
- 1 cup all-purpose flour
- 1/2 teaspoon salt
- 1 tablespoon unsalted butter, melted
- 1 tablespoon vegetable oil
Whisk the eggs and milk in a large bowl until well combined. Whisk the flour and salt in a medium bowl and add it to the egg mixture; stir with a wooden spoon or spatula just until the flour is incorporated—it will still be a little lumpy. Add the melted butter and whisk until the batter is bubbly and smooth, about 30 seconds. Let the batter rest at room temperature for 30 minutes.

While the batter is resting, measure 1/2 teaspoon vegetable oil into each cup of the popover pan. I’ll just say a word here about popover pans and why they are much preferred over muffin tins or ramekins. Their unique shape is what helps popovers rise so beautifully. Popover pans are narrow and deep – without much room to spread out, the batter has nowhere to go but up.
Adjust your oven rack to the lowest position, place the popover pan in the oven and heat it to 450 degrees.
After the batter has rested, transfer it into a 4-cup measuring cup or other container with a pouring spout (you will have about 2 cups batter). I skip that step because I whisk my batter in glass measuring bowl. Working quickly, remove the pan from the oven and distribute the batter evenly among the six cavities in the pan. Return the pan to the oven and bake it for 20 minutes. Don’t open the oven door – no peeking! Then lower the heat to 350 degrees and bake until the popovers (seen through your oven window) are golden brown all over, 15 to 18 minutes more.
Your popovers will come out of the oven high and mighty but don’t worry if they deflate after a few minutes. Toss the popovers out onto a wire rack or into a basket and serve immediately. If you like a drier popover, immediately pierce the top of the popovers with the tip of a sharp knife to release some of the steam.
I’ve had lots of fun with popover variations. I’ve made cinnamon breakfast popovers with vanilla, cinnamon and nutmeg added to the batter—the hot popovers are brushed with melted butter when they come out of the oven and sprinkled with cinnamon sugar. Those are delicious but I prefer the savory style. Sometimes I make them petite sized and fill them with chicken salad or leftover taco or Sloppy Joe meat. I’ve made them with Gruyere cheese and caraway seeds and also with chili powder, cumin seed and Cheddar cheese added. Chopped scallions and Cheddar cheese are a good combination, too. For a weeknight dinner they are great with a nice salad. Serve them with flavored butters when you have them alongside a roast.
Speaking of roasts – I was thinking as I made these that popovers are a lot like their cousin Yorkshire pudding – just replace the vegetable oil in the bottom of the pans with 1/4 cup beef drippings from a pot roast and you’ve got individual Yorkshire puddings. And that got me thinking about savory bread puddings. I’m totally inspired to try making one – more to come on that with my next blog post!
I hope you give these a try soon.
P.S. You can reheat leftover popovers (if you have any). Store them in a plastic bag and refrigerate them. When you want to reheat them, place them on a baking sheet in a 350 degree oven for 5 to 7 minutes. They may re-inflate a bit but don’t get your hopes up.
Explore our entire collection of bakeware and baking pans.