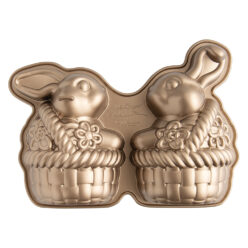
Product Used In This Recipe
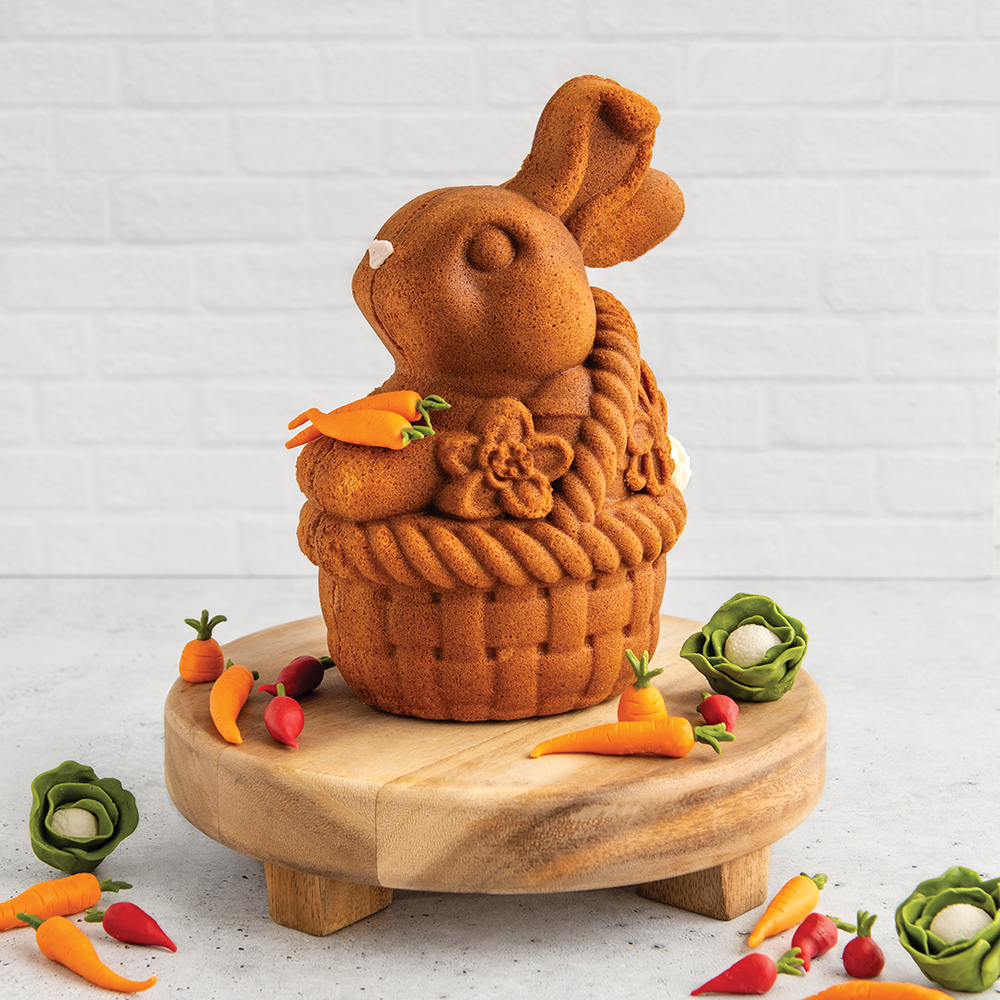
3D Bunny Vanilla Pound Cake
You are not logged in! Login or create an account here to save recipes.
Bake this vanilla 3D bunny cake that will have everyone hopping with delight! This simple, dense vanilla pound cake recipe shows off the intriciate details of this 2 piece bunny cake pan. Bake and assemble with our tips and tricks below to create a show-stopping 3D centerpiece and customize with your favorite frosting and decorations for the perfect spring Easter dessert. You can also serve this cake as two separate cake halves and let kids decorate each half as desired.
Ingredients
Bunny Cake:
- 3¼ cups all-purpose flour
- 1¾ tsp baking powder
- 1 tsp salt
- 2½ sticks (20 Tbsp) unsalted butter, softened
- 2 cups granulated sugar
- 5 eggs
- 1½ tsp vanilla extract or vanilla bean paste
- 1 cup whole milk
Buttercream Frosting:
- 3 cups confectioners’ sugar
- 1 stick (8 Tbsp) unsalted butter, softened
- 2 Tbsp milk, plus more as needed
- 1 tsp vanilla extract or vanilla bean paste
- Pinch of salt
Directions
Bunny Cake:
Note before starting: All ingredients should be at room temperature. Position a rack in the lower third of an oven and preheat to 325°F. Prepare Bunny Cake Pan with baking spray with flour and use a pastry brush to evenly coat the details of both halves of the pan. Alternately, prep pan with softened butter or shortening and dust with flour or cocoa.
In a bowl, sift together the flour, baking powder and salt; set aside. Using the bowl of an electric mixer fitted with a paddle attachment, beat the butter on medium speed until smooth, about 30 seconds. Cream together the butter and sugar until light and fluffy, about 5 minutes, stopping the mixer occasionally to scrape down the sides of the bowl. Add the eggs one at a time, mixing well after each addition. Add vanilla and mix until just incorporated. Reduce speed to low and add the flour mixture in three additions, alternating with the milk. Mix each addition until just incorporated, stopping the mixer occasionally to scrape down the sides of the bowl.
Spoon the batter evenly into the prepared pan, making sure to split between the two halves evenly. It is critical to fill the bunny’s ears to the top with batter and then fill the rest of the pan about ¾ full, spreading batter up the sides of the pan so the sides are higher than the center. Bake 60-65 minutes, until a toothpick inserted into the center of the cake comes out clean. Transfer the pan to a wire rack and cool cake in the pan for 10 minutes. Carefully invert the pan onto the rack. Note: If the ears do not rest flat on the cooling rack, use a folded towel to help support them while the cake cools completely. Let the cake cool completely, at least 2 hours, before assembling and decorating.
Buttercream Frosting:
Using an electric mixer fitted with a paddle attachment, mix together the confectioners’ sugar, butter, milk, vanilla and salt on low speed until combined, about 1 minute. Scrap down the sides of the bowl and increase the speed to medium to beat until fluffy, about 3 minutes. Add more milk if necessary, 1 tsp at a time, until it is creamy but still holds peaks.
Assembly Instructions:
Once cake is cooled, level the two halves by using a knife or cake leveler to gently cut off the part of each cake half that rose above the edge of the design. It can be helpful to place cake halves back into the pan and cut along top side of pan to ensure evenness. Make sure both halves are flat and fit together; fine trimming may be necessary. Spread a thin layer of the buttercream frosting, about 1/2 cup, over the cut side of one of the cake halves. Gently press the other cake half to secure the two halves together between the frosting. Let the buttercream frosting harden. If needed, refrigerate the 3D cake for 1 hour or until frosting hardens. *For a faster, simpler option, you can also use almond bark or chocolate to ‘glue’ the two halves together. Allow the cake to set up in the fridge before attempting to stand upright if using this method. Carefully place 3D cake upright on a cake stand or platter, anchoring with a dollop of frosting or almond bark. Decorate as desired with any remaining frosting, candies and other festive treats of choice.
Read Recipe Reviews
Write a Review
Write a Review
Ingredients
Bunny Cake:
- 3¼ cups all-purpose flour
- 1¾ tsp baking powder
- 1 tsp salt
- 2½ sticks (20 Tbsp) unsalted butter, softened
- 2 cups granulated sugar
- 5 eggs
- 1½ tsp vanilla extract or vanilla bean paste
- 1 cup whole milk
Buttercream Frosting:
- 3 cups confectioners’ sugar
- 1 stick (8 Tbsp) unsalted butter, softened
- 2 Tbsp milk, plus more as needed
- 1 tsp vanilla extract or vanilla bean paste
- Pinch of salt
Directions
Bunny Cake:
Note before starting: All ingredients should be at room temperature. Position a rack in the lower third of an oven and preheat to 325°F. Prepare Bunny Cake Pan with baking spray with flour and use a pastry brush to evenly coat the details of both halves of the pan. Alternately, prep pan with softened butter or shortening and dust with flour or cocoa.
In a bowl, sift together the flour, baking powder and salt; set aside. Using the bowl of an electric mixer fitted with a paddle attachment, beat the butter on medium speed until smooth, about 30 seconds. Cream together the butter and sugar until light and fluffy, about 5 minutes, stopping the mixer occasionally to scrape down the sides of the bowl. Add the eggs one at a time, mixing well after each addition. Add vanilla and mix until just incorporated. Reduce speed to low and add the flour mixture in three additions, alternating with the milk. Mix each addition until just incorporated, stopping the mixer occasionally to scrape down the sides of the bowl.
Spoon the batter evenly into the prepared pan, making sure to split between the two halves evenly. It is critical to fill the bunny’s ears to the top with batter and then fill the rest of the pan about ¾ full, spreading batter up the sides of the pan so the sides are higher than the center. Bake 60-65 minutes, until a toothpick inserted into the center of the cake comes out clean. Transfer the pan to a wire rack and cool cake in the pan for 10 minutes. Carefully invert the pan onto the rack. Note: If the ears do not rest flat on the cooling rack, use a folded towel to help support them while the cake cools completely. Let the cake cool completely, at least 2 hours, before assembling and decorating.
Buttercream Frosting:
Using an electric mixer fitted with a paddle attachment, mix together the confectioners’ sugar, butter, milk, vanilla and salt on low speed until combined, about 1 minute. Scrap down the sides of the bowl and increase the speed to medium to beat until fluffy, about 3 minutes. Add more milk if necessary, 1 tsp at a time, until it is creamy but still holds peaks.
Assembly Instructions:
Once cake is cooled, level the two halves by using a knife or cake leveler to gently cut off the part of each cake half that rose above the edge of the design. It can be helpful to place cake halves back into the pan and cut along top side of pan to ensure evenness. Make sure both halves are flat and fit together; fine trimming may be necessary. Spread a thin layer of the buttercream frosting, about 1/2 cup, over the cut side of one of the cake halves. Gently press the other cake half to secure the two halves together between the frosting. Let the buttercream frosting harden. If needed, refrigerate the 3D cake for 1 hour or until frosting hardens. *For a faster, simpler option, you can also use almond bark or chocolate to ‘glue’ the two halves together. Allow the cake to set up in the fridge before attempting to stand upright if using this method. Carefully place 3D cake upright on a cake stand or platter, anchoring with a dollop of frosting or almond bark. Decorate as desired with any remaining frosting, candies and other festive treats of choice.
Read Recipe Reviews
This recipe was amazing! My cake turned out perfect and was very delicious!
Posted by Elle